Hi Ya Friends!
Today marks the last of teacher gifts for this year. I hope you've found at least one idea to tickle your fancy :) Today's project is super easy, super functional, & super cute. This is something I created for myself :)
After 6 years, I FINALLY got a new whiteboard in my classroom. The last one wasn't even a real whiteboard- it was that slick material used for bathroom showers---> seriously! Well, my new real whiteboard is also magnetic which is a big plus- no more taping things to my whiteboard!!! It's so much easier & faster to use magnets- so that's what inspired today's project.
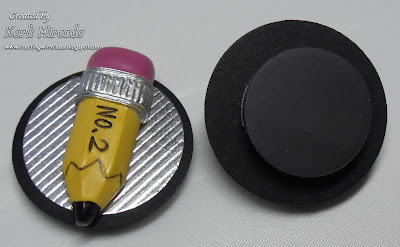
Here it is:
These are whiteboard magnets for holding up charts & anything else I want!
It all began with these buttons:
I happen to be a button maniac- I luuuuuuuuv using them on cards & projects. So when I saw these (at 50% off at JoAnns) I had to snatch 'em. They're pricey- but using a 15% coupon + the fact that they were on sale made it easier on the wallet. I didn't know what I was going to do with them at the time, but I think I found a perfect way to use them :)
I removed the shanks with my button shank remover:
(If you don't have one of these, you seriously need to have one! They remove button shanks like butter. They can be purchased at JoAnns as well.)
It's kinda hard to tell but the top button has the shank removed & the bottom one doesn't. Once the shank is removed, the back is flat & ready to use.) Be sure you remove the shank away from you as those little suckers can go flying!
Then all I did was add 2 cardstock circles & adhered the button with craft glue dots. I adhered a circle magnet to the back. I recommend these heavy duty circle magnets instead of the strips because these will hold charts in place. If the magnet is weak & thin, the chart will just slide down the whiteboard- and back to the tape you go!
These are mine, but if I was gifting them, I would do this:
I created a
mini-Pizza box.
I made a little whiteboard to decorate the lid cover from photo paper (it has that glossy, whiteboard look- you could also use glossy CS) and the frame from silver CS. I resized this chart of the pledge of allegiance & used micro pop dots as the "magnets" which I colored with a red Sharpie. I think this might give a hint as to what's on the inside:
The magnets! You could make dividers for each, or wrap them in tissue paper.
I used buttons, but you can use punches, die cuts, stickers- anything you'd like!
For today's gift going into the Teacher Bag o' Gifts is:
A set of Martha Stewart writing pens! I mean every teacher needs a set of great pens & these are GREAT! There are 4 black pens in different size points & 2 are permanent- for writing on different types of surfaces. They write like a dream- well done, Martha!
Don't forget to leave a comment at each teacher gifts post for more chances to win! Each comment you leave for each post gets you more chances to win :)
Here's a recap:
Teacher Gift #1:
Teacher's Trio Companion
Teacher Gift #2:
Welcome Back(pack) Teacher
Teacher Gift #3:
Note Holder
Teacher Gift #4:
Student Info Folder
Teacher Gift #5 Whiteboard magnets -you are here :)
Here is the total prize package:
The Greeting Farm: Teacher Anya Rubber Stamp
The Grade School Stack
Cutter Bee Scissors
Tim Holtz Design Ruler
Martha Stewart Writing Pens
Phew! That's 5 Teacher Projects, 5 fab prizes, only 1 lucky winner. The winner will be chosen through Random.org & will be announced on September 15th. Eligible comments/entries will close on midnight PST September 14th.
As always, thanks so much for peeking today.
Gotta Go!


