Showing posts with label Teacher Resources. Show all posts

Saturday, August 10, 2013

A peek inside... & some treats!

Hi friends,
So, the new school year is underway for me. The first week went well & I'm very excited about the new school year. 
Today, I'd thought I'd give you a peek inside my classroom & how I set up for the beginning of the year.

As you walk in, this is what you see towards the right. My seating arrangement is in rows that face one side of the room towards the other. This way, it allows for space in the middle of the room so I can get to the back of the room quickly & easily. It also makes it easy for students to work with a partner or form groups. I cut out the "Bienvevidos" (Welcome) letters with my Cricut.


This shot gives you a peek at the far left side of the room. At the far left is my desk area. I have two long banners of papel picado that hang across the room.

This is a shot of the far right side of the room. 

This is a shot from the back of the room looking towards the front. The little table in the middle is where I have my projector & laptop. 
 You may see the influence of my elementary teaching days in my classroom. Most HS classrooms are pretty plain, but I like my class to look colorful, inviting & fun!

And here's my desk. I had to take a pic of this because it won't look this for long! *Ü*
 Did you notice some of the boxes I created in the past for Teacher Gifts? I still have mine & use them everyday! And if you make one for your fave teacher she'll be enjoying them for a long time to come, just as I have *Ü* Check out the "Teacher Appreciation" label on the sidebar of my blog for tutorials & ideas.

Speaking of teacher gifts...
Here are the gifts I made for the teachers in my department.
I found these cute little buckets that had a chalkboard label on them in the dollar bin at Target. I wrote their names on it with a Sharpie paint pen. I added stitch marks around it then added a little apple sticker & ribbon strips to the handles. Cute & so simple *Ü*

Then I filled them with some treats.

Here's a closer peek at it.

The first day of school is such a busy day, we may not even have a chance to eat lunch until after school. So having a few treats to munch on during the day, helps hold us over until we can sit down to eat!

Thanks so much for peeking!
 ¡Adios!

Wednesday, December 14, 2011

Simply for Grammy

Hi ya friends,
Here are the last 3 "simple" cards I made for my Grammy. Besides the flower pot card, the ornament card is pretty easy- so I went with it for the last three.
Here's the first:
 This card uses the layered poinsettia & fancy tags dies. The sentiment is Signature Christmas by PTI & the paper is 25 days of Christmas by Simple Stories.

Número 2:
Same ingredients as the first plus add a smidgen of the Petals-a-Plenty embossing folder by SU. (i've always thought they made the perfect poinsettias :) I highlighted the pattern paper design by going over it with my Viva pens :) :) :) The sentiment is from the Holiday Greetings set from Amy R.

and number 3:
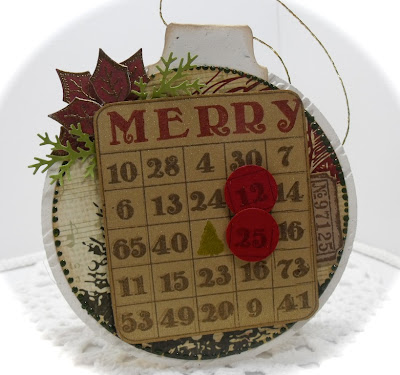
I used the Anyday Bingo & Crossword stamp set by Emma Aguilar to create the bingo card. (This is a reeeeally fun set!) and peeking from the side is ...
A T!m Holtz ticket from the 100th collection set.

Well, this is my attempt at simple :)
It's my last week at school & I feel like it's the slowest week of my life! Everyone is antsy for winter vacation to start---> especially the teachers! Haha!

Now, one thing I truly miss about teaching elementary is reading aloud to my kiddos. One of my favorite quotes is "Readers are made on the laps of their parents" and I think that's very true. I miss sharing all the wonderful stories with them, but if you're looking for some fun reading with the kiddos, I'd like to recommend these great reads:

1. Too Many Tamales by Gary Soto
 Maria tries on her mother's wedding ring while helping make tamales for a Christmas family get-together. Panic ( & fun) ensues when hours later, she realizes the ring is missing.

2. How Santa Got His Job

 Oh I luuuv this book! Now if you've ever wondered how Santa became Santa, this book will explain it all in a clever & funny way!

3. The Runaway Latkes by Leslie Kimmelman
This is a take on "The Gingerbread Man" but instead of a gingerbread man, it's a runaway latke :) Younger kids really like the repetition.

4. Olive the Other Reindeer by Vivian Walsh
When Olive the dog hears the phrase from the popular Christmas tune "all of the other reindeer," she concludes she is "Olive, the other reindeer" and heads to the North Pole to join Santa's team then the doggie adventure begins!

5. Merry Un-Christmas by Mike Reiss
Do your kiddos wish it was Christmas everyday? Well, in Christmas city they welcome one special day of the year- but it may not be what you think ;)

There are loads more books, but these are the ones I remember off the top of my head that my kiddos enjoyed & they may not be ones you might have heard of. Any fav's you'd add to the list??? Let's hear it!

Thanks for peeking today!

Gotta Go!

Saturday, February 19, 2011

Takin' Notes

Hi ya friends,
As you probably know, I teach Spanish to mostly High School Freshman. I'm really enjoying the change & on most days, it's very entertaining! Lots of comedic personalities! Well, I have a student who L-O-V-E-S to draw. Instead of taking notes in my class---> he's drawing. (How dare he not hang on my every word, right?!)
      Well, one day I confiscated his sketch book & started looking through it & I was blown away! His illustrations were quite frightening, but the detail was incredible. I asked him if he was in art classes & he said he really hadn't done much formal study. I told him how I work with people's stamps & digi images & he seemed genuinely interested. I said, "I'll tell you what, if you take notes during Note-taking time, I'll create a card with an image you create & you could give it to your girlfriend. That will score you some points with her- trust me ;)" So he accepted my offer & on the spot, in a matter of seconds, he drew a picture. He was pretty excited & handed me his illustration & then I said, "Oh wait, you need to sign it. Artists sign their work." so he was happy to do so.

Here's the card I made with his image:
I used one part of it (the bunny on the cliff) because the other part was a little frightening- LOL!
The bunny is looking up at a moon that resembles a mix between Mr. Burns of the Simpsons & Freddy Krueger! LOL!
I colored it with Copics & added flower soft for the grass.

I gave it to him & he was excited (which made me feel like a million buck$!) Of course, the other kids around wanted to look at it & suggested I sell my cards to Hallmark! Hee! Hee!

A few days later, I asked him if he had given it to his girlfriend and he said, "No way! I'm keeping it!"
Awww, make that 2 million bucks!

Just thought I'd share a little of how, as a teacher, I'm helping to create the future artists & graphic designers of the future :)
And is he taking notes during Note-taking time???
---> You betcha!

Monday, September 6, 2010

Teacher Gift: Student Info Folder

Hi there friends,
Hope you're enjoying this beautiful Labor Day Holiday (those of you here in the states).
Today, I've got another teacher project for ya. It's something I use in my classroom & love! I use it to jot down quick notes on students while teaching & working with them. I love it because I have info on my entire class in one organized place.

It's very easy to do & uses basic office/school supplies.
You'll need: 1 file folder, 5x8 index cards, & some tape
Here's the cover:
For the cover, I used the Simply Charmed Cricut cart to create the notebook page. (OMGoooosh, this cart is awesome!) It's got the cutest images that cover every holiday & major event throughout the year. If you love Doodle Charms, this is the cart for you! I deleted (hide/contour) the little smiley face that's on the page so it would be the blank notebook page. I cut out the letters from the Varsity Letter cart. The cute image is Teacher Honey from CC Designs. To finish it up, I added a little hand paper clip to the top corner & pen details along the edges.

To get started, you'll need to adhere an index card beginning at the bottom of the folder with a piece of tape as shown:
Then add the next one the same way lining it up with the red line- adding a piece of tape to cover the card & the folder. This will create a tab and will allow you to easily flip a card & write your note.
Continue the same way:
until you reach the top:
You will use 11 cards --->This gives me 10 spaces for students & the top page is there just to hide the info for the first student from sight (privacy).
Do the same thing to the other side. If you have more than 20 students, you can use the smaller index cards in the same way.

All that's left to do is write students' names on each tab.
Like this:
I usually do 1 side for boys, 1 side for girls & in alphabetical order by first name- that makes it easier for me to find a student.

Sadly, these gorgeous examples of the male specimen are not in my class- they are just examples. Plus, in my class, Johnny would come first :)

Huh? You haven't heard of Alexander or Joe??? (I KNOW you know my Johnny---> emphasis on the --->MY<---. Well, Alexander & Joe are THE hottest vampire & werewolf found on HBO's True Blood. So... now you know I'm Team Eric & Team Alcide!!! How can you ask a girl to choose???

WARNING: THE FOLLOWING IS NOT INTENDED TO BE VIEWED BY PERSONS WITH HEART CONDITIONS, HIGH BLOOD PRESSURE, OR WEAK KNEES. VIEWER DISCRETION IS ADVISED.

Meet Alex: AKA Eric- oh so cool!
Meet Joe: AKA Alcide- oh so hot!
Swoon...These guys rule! speaking of which... that brings me to today's prize going into the teacher bag o' gifts:
One of my most fav tools- Tim Holtz Design Ruler!

Hope you like today's project & the little extra eye candy I threw in there! ;)
Thanks for peeking!

Tuesday, March 30, 2010

Bunny Basket/Bag

Hi friends,
I wanted to share a simple little project my school kiddos make for Easter that is so super easy to make.
Here are the deets:

What you'll need:
*white lunch bag (or whatever color you want your bunny to be)
*cotton ball for the tail

Take your lunch bag

and follow this pattern to create the bunny ears & head. (We just eyeball it)

Cut it out while holding both sides of bag together.

Decorate your bunny however you'd like. This is where the kiddos can get creative & artistic. Hopefully better than my possessed bunny :( Maybe he's just entranced by my beauty ;)

You can cut a circle in half to make the front paws:
Oh ratatouille! I forgot, we add a bow like between his teeth and his paws. It looks cute so be sure to add it on yours :(

Then flip it to the back & add a drop of glue
And add your cotton ball on top for his fluffy tail

Now open your bag. The front flaps make up your bunny ears and the back flaps will become the handle to the bag/basket.
Add glue to the end of one of the back flaps
and stick the other back flap on it to create the handle.
(See the front ears & the back handle?)

That's all folks! Your bunny is ready to be filled with egg-y goodness :)
See??? Easy-peasy lemon squeezy.
Thanks for peeking! I'll be back... with a teacher Easter gift to share.
Gotta Go!

Tuesday, October 13, 2009

Celebrate Success- September

Hi friends,
Today, I thought I would share the two projects my school kiddos made to "Celebrate Success." It's a way I recognize those students that have done a great job with homework & their behavior. We do a crafting activity as the prize each month. The requirements to be at each month's Celebrate Success Special Activity are:
1) Have 100 merits (They start with 100 merits & are taken away for no homework, classroom disruptions, problems at recess, or other infractions. They can also earn them back.)
2) Not have 3 Homework Alerts for the month. They get a homework alert for not having homework completed each day.
Anyhoo, I had 12 students (out of 20) who earned the special activity which is pictured above. They made a magnetic bookmark and a little backpack.


Here's the bookmark (they make one that looks like them- this is me)For the bookmark, they got to choose their "mini-me's" clothes, hair style, colors- everything (using my scrap papers & Sizzix dies.) I work the machine, they pick what they want & assemble it.
Here's the inside (you can see the magnetic closures)


Now for the backpack:
I really wanted them to make the backpack here, but I thought it would be too hard & time consuming for my 3rd graders. When I looked at it, I realized that basically, the base of the backpack was like a paper bag & "BAM!" just like Blair Warner from the Facts of Life (TV show) "I had another one of my brilliant ideas!" (Hee! Hee!) Why not use a little paper bag? And as you can see, it worked really well & was soooooooooo much easier to make! ( I bought the bags in blue -our main school color- at Uncle Mike's. They come in a package of 16 for $3.99.) They're not regular lunch bag size, they're much smaller.

It is made with many of the same elements as the original backpack with a few changes:
The front pocket is faux. It's just a rectangle with a half circle popped up with foam tape. The top flap was cut out with my Coluzzle template. We added the buttons & the stitching details with a white gel pen. Yes, it does have the ribbon straps on the back too! They do all the work themselves & I help where needed. I punched the holes for the ribbon, and they threaded the ribbon in the holes & taped the ends to the inside.

It closes with a small piece of Velcro.We added some school supplies (erasers, pencil sharpener, mini-pencil, mini-notebook) I bought from Oriental Trading Company at the beginning of the year. They loved them!

I'll give you a peek of this month's Celebrate Success project soon. I hope none of them read my blog so it stays a surprise! ;) For October, it's Halloween themed. (If there's a student who cannot participate due to religious reasons, I provide an alternate activity.) By the way, I didn't bring my camera to school the day we made these & they DID NOT want to leave them until Monday when I could take a picture. :( But I'll ask them to bring their mini-me's so you can check them out. They were so cute!

Thanks so much for peeking at our kid creations. My little one was sent home from school sick :( so I'm off to get him some tea~~~> Gotta go!

Blog Widget by LinkWithin