Showing posts with label Templates. Show all posts

Sunday, July 14, 2013

10 Minute Card Homework video

Hi friends,
Today I have a card that's the homework for Day 4 at Card Camp. The assignment is to create a 10 minute card which I have become smitten to pieces to do! This is the definition of a card challenge, but it's loads of fun too!
Here's my card:
 I used 4 required colors: pink, orange, green, gray.
I have been having fun making videos lately because once school starts, I know I won't have time for it :(

Did I make the 10 minute challenge???
You betcha!

Here's the video proof:

Or watch it on You Tube---> HERE

I created the butterfly pattern on my Gypsy in 4 different sizes. I have shared the file before but here it is just in case you'd like it.

Download GYPSY file---> HERE.
Download PDF file---> HERE.

Thanks so much for taking the time to stop by & take a peek at my cooky videos!
Tootles!

Saturday, July 6, 2013

Craft Dash for a Cause

Hi friends,
Today I have a card I created for: the 10 Minute Craft Dash at Pretty Pink Posh

  and for the JULY Cards for a Cause at SCS.
The challenge at PPP is to use stars on your card & add a sun for the cards for a cause.
Here's the finished card:

It took me this long to complete the card:
I learned a few things since the last time I filmed so I think this video is a bit better than the last one. This time around:
1) I had a clear card concept so i took out the supplies i was most likely to use & "KISSed"- Keep It Simple Sweetie!
2) I figured out how to better record myself *Ü*
3) I did a voice over so I could focus on just creating the card during the video & not on what I was going to say too. I really think that was a time saver & it freed up some brain cells too *Ü*

So, was everything perfect? Umm, no. It wouldn't be me if it was all perfect! Hee Hee! I goofed a couple of times, but it was fun! I really appreciate everyone who also take the time to create a video of the process because I enjoy watching other people stress out too! *Ü* ...and I say that with love ;)
If you have any tips, tricks, suggestions for videos, I'd love to hear them! I'm not a tech person & honestly, I just play around with stuff until I get lucky figure it out. And if I get really stuck I look on You Tube for help! I think because I'm on a mac & using imovie, it helps a lot ---> user-friendly.

As I mentioned in the video, I created the sun rays card front on my SCAL 2 and if you'd like it, you can find it---> HERE.
SVG file format---> HERE
PDF file format ---> HERE
I based it on a free cut file from CKS- by Laina Lamb--->HERE.

July's cards for the Cards for a Cause are going to the Sunshine Mail Foundation. Here's a description: 
"They are a 501c3 nonprofit, provides children in need comfort, support and joy through free Sunshine Mail Care Packages. Sunshine Mail is filled with handmade cards, care essentials and other age appropriate items and delivered to children in hospitals, homeless shelters and in foster care."
You can find all the info ---> HERE. Once I finish all of the cards,  I'll be sure to post them. Here are the finished cards: 1 dozen ready to ship!
Here's the video:

or watch it on you Tube---> HERE 

EDITED TO ADD: Regarding the cut file... It will work if you have the Sure Cuts A Lot (SCAL) software program (or something that will cut svg files like a Silhouette, or e-clips) unfortunately because Provo Craft (the makers of Cricut) sued the makers of SCAL, the current version of SCAL (SCAL 3) will NOT work with your Cricut.  :(  Those of us who were fortunate enough to purchase SCAL 2 BEFORE the lawsuit are able to use the software to cut on the Cricut. I'm sorry if this disappoints those who are Cricut owners who wanted to use the cut file, but don't have SCAL 2.  I know I would be disappointed too.  I will make a PDF of the file available to you. Sorry if there was any confusion.
 Please let me know if you have any questions.

Thanks for peeking!
Tootles!

Tuesday, June 11, 2013

Cap & Gown Grad Card & Tute

Hi ya friends,
Today I have a cap & gown style graduation card to share with ya.
Here it is:
I made one similar to this one last year & thought I'd make another one & create a tute for those who have asked how I made the one from last year.

Here are the innies:

Lots of pics & details coming your way, so grab a cup of the good stuff & get crafty!
Here's what you'll need:

I started by creating a template for myself (which I will share with ya, of course :)
Start with a sheet of cardstock: 5 1/2" x 8 1/2" and score at 4 1/4"
 (or start with a sheet of 8 1/2" x 11" cardstock, cut in half to get 2 card bases.)

 Trace the template
and cut out that triangle section. Erase any pencil marks.

TRIM: cut 3 strips from 8 1/2" cardstock as shown in pic: 3/4", 1/2", 3/8"
 I used 3 colors to match the school colors but you can use as many as you want.

 Adhere all three strips together.

Cut the strip in half. (As you can see, I eyeballed "half" so it isn't perfect, but it's OK, really *Ü*
Next:
 Leave about 1/8" of "V neck" edge & adhere the trim. You want to be sure you have excess hanging from the top but doesn't go off the sides of the card base.

Flip it to the back & cut off the excess trim.

It should look something like this:
(Don't worry that the bottom edge of the trim doesn't look even. I got this!)

Moving on to the INNIES...
 Cut a white piece of cs at 4" x 5 3/8" (or cut a tiny strip off 5 1/2" ).  Find the center point (2") and make a mark with your pencil.

 I cut 1 3/4" down the mark i just made.

 Take the top corner edge & paper airplane fold it forward.

 Do the same thing to the other side. That creates the collar.

Adhere to the card base, making sure the collar is centered from the front.

This step is OPTIONAL:
 Add a couple of adhesive squares under the triangles to hold them down, but maintain dimension.

The TIE:
 I simply make a knot using  1/4" piece of satin ribbon. (you can use cardstock or wider ribbon.)

 Tighten the knot a bit...
 and trim off the excess.

Use glossy accents to adhere it to the shirt.

Here's what it should look like so far:
That trim edge still buggin' ya? don't worry, I GOT THIS!

Next, we'll work on the mortarboard:
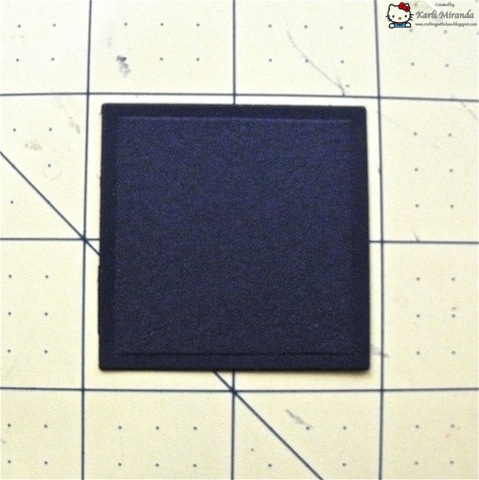
I used a Square Nestie, but if you don't have one, simply cut a square 1 3/4". I like the way the die leaves a debossed edge. A 2" square will work too for those of you that don't want to fuss. I used the 4th largest die from the SMALL set.

 I also used it as a guide for making the tassel. I simply wrapped the gold floss around it a few times...
(By the way, NO, your eyes are not playing tricks on you- I have removed my Acrylics & my Gel nails that I've worn for YEEEEEARS... now they're shorties...tear, tear, but that's another story for another time...)
I digress...
 Gently pull off the floss & use the end of it to wrap around the top to create the tassle.

 Trim the bottom edge to the length desired- voilà!

 Pierce a hole in the center of the square

 Add a brad, but don't push it all the way down & open the prongs just yet.

 Decide on how much you want the tassel to hang & wrap the end under the brad. Now, press it flush with the square & open the prongs in the back. This will secure the tassel.

Add foam squares to the back to give it dimension.

Now we'll take care of those pesky trim ends by simply covering them up with the mortarboard *Ü*
You want to be sure the point of the board is just slightly over the tip of the "V". (see arrow)

Guess what comes next... yup! Dunzo! Like a boss :)

NOTE: Omit the tie if the card is for a female graduate. Add little pearls or blingy instead :)

Last Note: If you want to stamp something on the front, be sure you do it before adhering the mortarboard to make it easier.

Here's the finished card:


and a group pic:

Hope you liked my interpretation of this fun card style which leaves the door wide open for other types of these cards. Hope that you enjoy *Ü*

Oh, I also used the template on the scrub card:

Download the template---> HERE.

If there's anything that's clear as mud, let me know & I'll try to explain it better and/or answer your questions.

Thanks for stopping by today!
Tute-tootles!

Monday, February 25, 2013

Valentine Treats

Hi there friends,
I had forgotten to share the Valentine treats I made for my school chums. I revised my lollypop treat wrapper to better fit the Sees pops I bought. They are the same length as the original ones, but these are not as wide.

Here they are:
Here's a closer peek at one of them:
 I usually add a tiny tad of double sided adhesive to hold the pop in place, but still be able to easily remove it from the wrapper. I used some K & co papers, my heart nesties, & the conversation hearts EF to dec it out.

Here's a peek of the back:
 and from the side:
 See that Cinnamon pop?! Yum!!! It's like one big Red Hot *Ü* They're only available during the holiday season so I grab a few to enjoy!

One other thing about the new wrapper is that I was able to squeeze 5 of them on a 12 x 12 sheet. I will be uploading that from my Gypsy to my computer  & share it with ya soon.

Thanks so much for peeking!
Tootles!
Blog Widget by LinkWithin