Sunday, December 30, 2012

Always Have High Hopes

Hello dear friends, 
As we come to the end of another year, allow me to thank you for taking the time to peek at my concoctions. I truly appreciate your sweet comments too  *Ãœ*

So here's my last card of the year:
  "Always Have High Hopes" While we may be discouraged, confused, or hurt by what happens by things we can't predict or control- we can chose how we respond. It may not be easy, but we do it anyway. That's something to feel good about. 

Here's a peek of the innies:
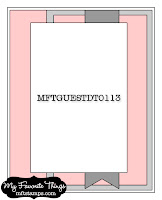
I'm giving it one last go for next month's GDT at MFT with this sketch:
A girl can hope, right?!  *Ãœ*

As you ring in the new year, have loads of fun & be safe!
See you next year! And.... HAPPY NEW YEAR!!!


The 411 
Stamps: Up up & Away- MFT
Paper: Cowboy MME, gray cs
Ink: London Fog
Tools: Fishtail flags- MFT, chalk

Saturday, December 29, 2012

You are Purrfect

Hello there friends,
I have a card to share today that got me out of the Christmas card mode.
Here it is:
This little PI tugged at my heart strings with that little kitten :) but this is the first time i ink her up. She's colored with Copics & her dress is paper pieced. The stitching is stamped, but soon ( i hope) there will be no more faux for me. Yup! You heard it right. I got a sewing machine despite my fear of them. (Remember that's how I got my tarantula too :) So as soon as I watch the DVD, learn how to get started, and stop shaking & squealing, I'll be a stitching fool!

I used this week's MFT sketch (flipped):
Thanks for peeking today!
Off to play with more of my neglected stamps :)
Adios!


The 411
Stamps: PI purrfect- MFT, Hanging by a thread- Technique Tuesday
Paper: Love Struck- WeRMemory Keepers, Baja Breeze, White SS
Ink: Memento- Rich Cocoa, Rose Red
Accs: Baker's twine, Viva Decor pearl pen

Thursday, December 27, 2012

Grammy's Card

Hi ya friends,
Hope you have recouped a bit from the holiday blitz in time for the New Year's one coming up :)  I must have been a reeeeeally good girl this year cuz I got lots of new toys this Christmas! Ha! Santa must have not been checking too closely ;) wink---> My fav gift was a new ipad 4! Now my Apple trifecta is complete! I have a mac computer, an iphone, & now an ipad! Yay! Annnnnd, I got the new Pendergast novel Two Graves which I'm reading on my new ipad :)

I realized I forgot to post the Christmas card I made for my grammy. I have wanted to make this card style since I first saw it & i knew she would love it.

Here's my card:
 It's a tea light easel card. The ones that I've seen twist to one side, but I wanted to make a forward facing one with room for a small addition of the poem "Twas the Night before Christmas" heat embossed in gold at the top.

Here it is lit: (sorry for the weird lighting :(

A closer peek:
As you can see from this shot, I layered the poinsettia 3 times to make it dimensional. I added glitter to the flame & the melted wax part. i thought the candle image was *perfect* for this card style. Oh! This beauty is called Holiday Poinsettia Candle from Heartfelt Creations. I luuuv the stamps  and coordinating dies in this collection! Just so preeeeetty!

Ack! I can't believe how this week just flew by! That means my vacation is half over & I still have so much I want to do :( Ah well, better make the most of next week!

Thanks so much for peeking today.
Hope you have a couple of lovely crafternoons this weekend!
Gotta Go!

Wednesday, December 26, 2012

PTI Blog Hop

Hello friends,
Today, I'm joining 

The challenge this month is White & White and with that comes the challenge of photographing white on white! But here's my attempt (apologies):
My simple card:
 I used the number dies & the "happy" die to create this "happy 2013" card. I added a little swirly & a strip of MS crystal tinsel glitter to the bottom edge.

My second card:

This was a bit of a happy coinkidinky cuz I used the negative space (after cutting out my numbers for my first card) for this card. I added the happy across the middle, punched a border along the bottom, framed the edges with my pearl pen, & added another strip of glitter.

Card #3:
For this card, I cut strips of card stock in to banners, ran them through some different embossing folders, and layered them underneath half a doily. Then I added the "happy 2013" with a strip of tinsel glitter at the top.

Even though it doesn't look like it, I can assure you these are all white cards!

Thanks for hopping by!

Monday, December 24, 2012

Happiest of Holidays!

Hello friends,
Thank you for taking the time to visit my little blog and for all the good cheer you bring me all year long!
Click to play this Smilebox greeting
Create your own greeting - Powered by Smilebox

Wishing you lots of lovely crafternoons! Merry Christmas! ¡Feliz Navidad!

Sunday, December 16, 2012

Treat Wrapper Inspired

Hello there friends,
Today I'm sharing a little concoction brewing in the depths of Studio K---> my craft room :)  I really liked the lollypop wrapper dies I've seen, but I thought they were a bit pricey---> even for me, Miss "OMG! I luv that! I have to have that! I don't care how much it costs!" Well, I thought it was too much for just one die :( so my brain started thinking... I took a couple of Tylenol... and then it hit me. Why don't I try to make my own version using my Gypsy, of course :) So in to Studio K I went & came out with my own version.
Here's what I made:
These are inspired by the lollypop wrappers. This is a cute way to dress up those yummy lollies, but I thought why stop there? 
Here's what's inside:
How about a cake pop!
Here's how easy it is to put together:
Other wrappers have two holes where you'd lace your twine or ribbon through, but I simply wrapped around the "neck" of the wrapper & tied a knot and that held it together just fine.
Now the fun part: DECORATE!
Here's another cake pop wrapper:
And a peek of the innies:
The next one does have a lollypop-

a See's Limited Edition Christmas Mint:
For this one, I kept it super simple- no pattern paper. Just used white cardstock, ran it through my Snowflake embossing folder, punched out a couple of MS snowflakes & added some Stickles for sparkle.

Oh, how about a peek of the backsides:
I added a cute little tag for the recipient :)

But don't think you can only use these for pops of some kind, nooooooo.
Take a peek at this one:

 And the innies:
A few candy cane kisses :) i added 6 in the same size baggie as the cake pops. For this one, I simply stapled the baggie & wrapper closed & added the embellishment on top.

I hope this gives you some sweet ideas to wrap up some sweet treats! You can use these for so many other treats as well :)

Soooo, am I sharing?
Oh, friends 'tis my Christmas/Hanukkah/ Kwanzaa/Diwali/ gift to you! :)
You can download the PDF template---> HERE.
You can download the GYPSY file---> HERE.  You can get 4 wrappers from a 12x12 sheet of paper.
(You'll need the George & Basic Shapes & Sweet Treats Cartridges to cut them out. I simply welded two party hats & a rectangle :)

SCORING Directions: I tried to create little notches to help you know where to score, but it can be difficult to see them especially with pattern paper, as I discovered :(  The template has the directions on the page, but if you're downloading the GYPSY file, I found that the best places to score are at 3 3/8" and 5 1/8". Be sure your paper is butting up on the left hand edge of your scoring board, if you're using that.

You can find the cello baggies I used at Mike's. They are the small 3"x4" size & come in  pack of 100.

I bought a cake pop machine so the boys & I are going to have fun making a few. Hope some make it to the wrappers! :)

Happy holiday crafting!

Monday, December 10, 2012

Sweet Sketch Duo

Hello friends,
We're wrapping up the semester at school so I'm crazy busy right now, but I made a few cards with this Sweet Stop sketch:
 Here are my cards:

 There's one little problem... I forgot to post them in time to participate in the challenge :(

But, I'm on time for this week's sketch :)


Here's my card:
 I die cut a window on the front of the card to peek into the inside.

Here's a peek of that:

I'm off to grade projects. Thanks so much for peeking today!
Gotta Go!

Sunday, December 9, 2012

O' Christmas Tree... stamp

Hello again friends,
Today I have a card to share that I made for my Grammy. Well, not actually for her, but for her to give someone else.
Here it is:
 I luuuuv this stamp set! I know I luv everything (and I do) but I really luv this stamp! It's been well loved already. It's called Seasonal Sentiments from MFT. I cut out each row of words, added pop dots to the back, & layered them on top of the stamped image. i added a bit of MS snow glitter under the tree & a little poinsettia to the edge. The pattern paper is Season's Greetings by Echo Park (more of last year's hoarding showing through ;)

Here's a peek of the innies:
The sentiment is also part of this set, & I added snow glitter to the bottom edge here as well.

I used this week's MFT sketch:

Thanks much for popping in today!
Gotta Go!

Saturday, December 8, 2012

Peaceful Pinecones

Hola Friends,
Hope the holiday season has been jolly thus far :) I have been a busy little elf in my workshop cranking out cards for my peeps. I've been so busy creating, that I forgot to post them :( which means I 'll have a few things to share this week on the blog-o. But first, I got a chance to play with this week's Mojo Monday sketch.
Here's my card:
I used the Peaceful Pinecones set from PTI (luuv!). The sentiment is from Signature Christmas, also by PTI. The papers are from the Jovial collection from BasicGrey (yes, hoarded from last year ;) Due to my photog skills (or lack thereof) the main cardstock layer looks yellow, but it's not. It's PTI's Fine Linen.

Here's this week's Mojo Monday sketch:
Oooooh, did I eeeeever want to make a Valentine's card with this sketch! But no, I need Christmas cards...Christmas cards....Christmas cards....

Thanks so much for peeking today.
Happy Sunday!

Tuesday, December 4, 2012

Origami Butterflies Tute

Hello friends,
Sorry I haven't had a chance to post this earlier, but I've been really busy at school. The semester is coming to an end soon, so there's a lot to do! I also have to apologize but I only had a chance to take pics at night & well... you know my horrid photog skills in the day time so...night- no bueno :( but hopefully, you'll get the point. 'Nuff blabber & let's get on with the deets:

Here's a card I posted with the origami butterfly I'm going to show you how to make today:
Now, here's the tute:
I created this on my Gypsy, but for those of you that don't have it, I have also included a pdf template. You can download the GYPSY file ---> HERE.
Download the pdf ---> HERE

I used my MS score board because it makes it easy to do, but use whatever you like for the score lines.

Begin by making sure your shape is straight.

I start by scoring the "neck" first. (see red arrow) that ensures there will be a score line there once we get going. muy importante. ;)

For visual purposes, I went over the score lines with my pencil so you can see it easier, but you would simply score at every 1/4". A.k.a every other score line on the MS board.

Score the entire shape.

Now you'll accordion fold on every score line---> back & forth...

back & forth...

don't stop now! keep going... 'til you're done :)

Now, squish it tight across the length. The tighter, the better. (yes, squish is the technical term, but squeeze and scrunch are acceptable too ;)

Next, I take & make a loop with twine. You can use thread, twine, jute, floss, hemp cord, whatev :)

Then just wrangle it to the center, still holding on to it. (ask for another hand or use a clothespin to hold on to it.)

Now, tie a tight knot.

Here's your preeetty butterfly :) All done...;)

Wait! Not just yet... here's where the magic happens :) If you notice, there's a longer end to your butterfly. This is the top. So make sure the "antennas" are up there.

Now, fan out the sides of each wing.

Spread them out. You'll start to see the butterfly emerge in front of your very eyes!!!

Adjust those wings until you're pleased with how they look. Tah dah!!! Dunzo! Easy peasy, right?!

In your template and GYPSY file, you'll find I've created 4 sizes as pictured below.
I hope you'll give it a go! They're easy & fun & are a lovely embellishment on a card, scrapbook page, or project. This is something the kiddos can do too!

Here's one more card:

Thanks for peeking today!
Gotta go!


Blog Widget by LinkWithin