Friday, September 30, 2011

The Return of Spanish Tilda

Hi ya friends,
Today I have a card to share with you that I made for our newest addition to our Department. Being that we teach Spanish, I had to go with my fav mini-me---> Spanish Tilda. Oh I luuuuv her so!
Here's my card:
 I tried to color her like our new teacher- with auburn hair. The papers are from MME Lost & Found Rosy Collection & she's colored with Copics. As you can see, I'm still keeping with my design style of "More is More" ---> More layers, more embellies, more Viva Decor pen, more, more, more :)

Here's a closer peek at this adorable girl :)
I'm slowly getting back to semi-normal so I've found a little extra time to craft :) I've even started working on some Halloween stuff! Yes,  I'm just as shocked as you are ;)

I used this week's sketch at The Sweet Stop- (luv their sketches!) but sadly, not in time for the challenge.

Thanks so much for peeking today!
Gotta Go!

Tuesday, September 27, 2011

Bag Topper

Howdy friends,
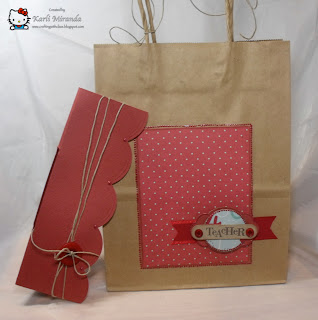
I wanted to share a quickie project today. I like embellishing my own bags & adding a bag topper is like icing on the cake.

Here's the bag:
As you can see, it's a plain kraft gift bag with some simple embellishment. I used some scraps left from my Calendar Cube project ;) but what's cool is the bag topper!


It slides right off the handles, so the recipient doesn't have to tear open the bag, but the contents are nicely hidden.

Here's a peek from the top:


Here's a quickie how-to:
First, measure the length of your bag since bags are slightly different. Leave 1/4" extra on each side.

Cut a cardstock piece the length you just measured that when folded in half, will be long enough to punch a decorative border & overhang the front & back.

Then make pencil marks on your cardstock on the OUTSIDE of the handles. You'll want to move your marks 1/8th inch past the handles so that it slides easily over the handles.

I used my word window punch to trim in between those pencil marks. You can also use a craft knife.

Here's what it will look like:
Then you simply slide the handles through the opening & your bag topper is in place :)

We have a new teacher in the Spanish Department who has survived her first month of school so we're adding some goodies in the bag to celebrate!

I have a variation on this so I'll share that next time!
Hope these directions were OK & that you give this a go. I should have thought of making a tute while making it, but alas...
Gotta go!

Monday, September 26, 2011

Copic 101


Hi friends,
I get several questions about Copics. I don't think I'm a Copic expert, but there are a few things I've learned over the past year & a half of using them that will hopefully help those of you getting started, or those who have similar questions. Michael's is starting to carry them, so before you take that expensive plunge, learn from some of my experiences & mistakes.

Q: Copics are expensive. Should I buy them in sets?
A: No. I bought many of mine in sets & if I knew then what I know now, I would not have done that! Sure, it would be great to have all of the colors, but what's the point of the expense when you may not use them all? I have several markers I've never used that are sitting there collecting dust :( ---> waste of money! Why? just because markers are packaged in a set doesn't mean they blend together. Instead, I would recommend you buy them in color bundles. That is to say, about 3-4 color markers that blend well together.
ETA: (thanks for the reminder, Shelly :) One set I do luuuuv & recommend is a past color collection of 0000. It's hard to go light with Copics, but the 0000 collection are lighter pastel colors. This is a great set to add to your stash.

Q: Which colors should I buy?
A: That is up to you. Lots of bloggers list the colors they've used on their creations. If there's a color combo that catches your eye, jot it down. For example, my go-to skin color combo is E000, E00, E11 & R20 for blush. There are several companies who have put some marker colors together to take out some of the guess work. Some have even bundled markers to match their cardstock & ink colors.  Flourishes, Papertrey Ink, Susana's Custom Art & Card Design (who carry colors chosen by Suzanne Dean) are just a few. I tend to use PTI colors because I use their cardstock often & I like those colors to match. I personally think if you can only do a few colors, get skin tones first, then hair colors. You can get away with using other markers & coloring mediums that are far less expensive for the rest.

Q: Which is better, Sketch or Ciao?
A: I would not say one is "better" than another. That is personal preference. Some people prefer the oval barrel of the sketch. Some people prefer Ciaos as a more cost effective option. I own both. The main differences between them are that Sketch hold more ink therefore cost more per marker. Sketch have the name & number printed on the end cap, Ciaos don't (but I made my own for the Ciaos & you can download that chart HERE). Ciaos have a safety cap, so if a child or pet swallows one, he/she will be able to breathe. You can use the Ciaos in the airbrush system by adding some foam pads to the chamber.

Q: Should I become "Copic Certified?"
A: That depends on what you're trying to accomplish. Are you trying to learn about the markers because you plan on selling/distributing them, teach others about them? Then yes. Are you wanting to learn what colors will blend, coloring techniques that will improve your coloring skills? Then not so much. If the latter is what you want to accomplish, take a techniques class. Some of the Copic regional instructors offer Copic techniques classes as do some Scrapbook stores. Suzanne Dean has online classes Color Me Creative that will help you on your road to becoming a Colorista. But the single most important thing you can do is PRACTICE!!! yes, just like anything else in life ---> practice is key. But to truly reach the level of Colorista you should: have knowledge of techniques, knowledge of good blending colors, & PRACTICE. Check out loads of You Tube videos for specific coloring tips from crafters everywhere.

SCS has a whole thread about Copic Chatter. You can find that---> Here.
Marianne Walker IS a Copic expert. You can check out her blog---> Here.

Enjoy your Copic adventures!

Sunday, September 18, 2011

Desktop Calendar Cube v2

Hi again friends,
Today I'm sharing a modification to the Desktop Calendar Cube project I shared last time. One of the ladies from the class I had, Mary, thought about adding a hutch or cover over the cubes and I thought it was a great idea! Plus, it might make it harder for our little darlings to be able to grab & throw them ;)  To take it one step further, I thought this would be a good place to add a Day Label :) You decide if you want to add that or keep it as it was originally if you make one yourself. Here's the new version:
This one is for my desk:

 This one is a sample for my friend's store:
Here's the original, no cover:
 and here's V2 with the cube cover:

The space between the back panel & cube cover allows you to push the cubes forward to easily change them out. 
 I clipped the months together with a mini clothespin as well as the day labels.

Here's what you need for the cube cover:
CS cut at 11 1/2" x 1 7/8"
Score: 1/2", 2 3/8", 6", 7 7/8"

A)  Glue the 1/2" tab under the long flap.
B)  To strengthen the top, cut a piece of chipboard at: 1 3/4" x 3 1/2"
C) Cut a piece of pattern paper the same size & adhere to cover the chipboard
D) Glue the chipboard piece to the top of your cube cover.
E) Add strong adhesive to the bottom of your cube cover & glue to the top of the small drawer.
F) Add your mat layer & Day Label to the top of the cube cover

The mat for the day labels: 1 1/2" x 3 1/4"

I also created, by request, some Spanish Month & Day labels if you'd like to make it in Spanish :)


Oh, the completed kit goes to:
  #6 Susan
Please email your deets & I'll send you a custom kit.

Thank you for your comments everyone!

Monday, September 12, 2011

Teacher Gifts- Calendar Cube Tutorial

Hi friends,
Today I am sharing a little project I have had spinning in my brain for a while. I've been wanting a calendar for my desk at school to match the other things I've made. So I decided to get the idea out of my head & make it happen.
Here is what we'll be making today:
This cube features a Kleenex dispenser, 2 pull out drawers, 2 date cubes, and a top organizer.

So, ready to get started? Well, grab a venti-sized cup of joe cuz this is a lengthy tute!

Sm. Drawer:
Cut: 6 1/8" x 6 1/8"
Score: 1" on all sides
Assemble your box.
(If you need directions on how to assemble a basic box, please see this previous tute. Use the box lid ~blue)


Sm Drawer Sleeve
Cut: 4 1/4 x 11"
Score: 1", 5 1/4", 6 1/4", 10 1/2"

 Slide your drawer in:
***NOTE
Add a piece of 4" x 4" chipboard to the top of the box to give more support to the cubes.
Add some patterned paper to hide it


Lg Drawer Box:
Cut: 7 5/8" x 8 5/8"
Score: 2 1/4"on all four sides


Lg Drawer Box Sleeve
Cut: 4 3/8" x 12"
Score: 3/4", 3 1/8", 6 3/8", 8 3/4"


Slide your box in the sleeve

Tissue Wrapper:
Cut: 7 1/4" x 4 3/8"
Score: 1/2", 1 1/2", 3 7/8", 4 7/8"
Use punch, die, or craft knife to cut opening for tissue to be pulled out through. I used the SU word window punch.
Assemble your box & slide tissue pack in.

Top Organizer:
Cut: 4" x 12"
Score: 2", 5 3/4", 9 1/2", 10 1/4"
Add adhesive & fold as shown
Adhere to the top of sm. drawer box


Add strong adhesive to the back of the Tissue Wrapper & adhere that to the front side of the Lg drawer box.


Add strong adhesive to the bottom of the sm. drawer box...

Adhere it to the top of the Tissue and Lg. box

Wrap a piece of ribbon around the back part to create a pocket.

Add a bow on top

Calendar Cubes:
Download GYPSY cut file for cubes. You'll need the Tags, Bags, Boxes, & More Cricut cart. For the numbers, you'll need the Hello Kitty cart. :)
Don't have a Cricut? No worries, DOWNLOAD THE TEMPLATE I created for you.
Use a 1 1/2" square punch to punch the layers for the numbers. Adhere them to the cube & assemble.
The numbers should be glued as follows:
Cube one: 0, 1, 2, 3, 4, 5
Cube two: 0, 1, 2, 6 (which also will serve as a 9), 7, 8

Place the cubes on top of the sm. drawer box.

DOWNLOAD the MONTHS and DAYS LABELS. Cut them apart on the solid lines...

Put a piece of magnet tape to the back of each one.
Put a magnet coin on the mat label:
Add your month label.

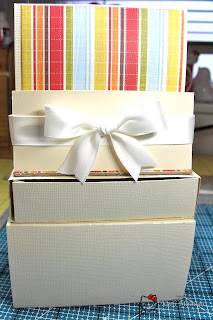
Here is the finished front of the box

I've also included a couple of fun countdown labels:


Here's the final product, embellished

The back pocket could be used to hold your month labels or to hold other items like a pad of Stickies.
With the open drawers:

***NOTE: the drawers are "push" drawers. The buttons are decorative, not strong enough to be used as pulls.

Well, that's it! Hope you like this project & you give it a go :) There's a version 2 of this project I'll add later. I have a kit to give away complete with everything you need to create this project, pre-cut & pre-scored. Just leave a comment :) Yup, this is open to everyone :)

Thanks so much for peeking today!
Gotta Go!
Blog Widget by LinkWithin