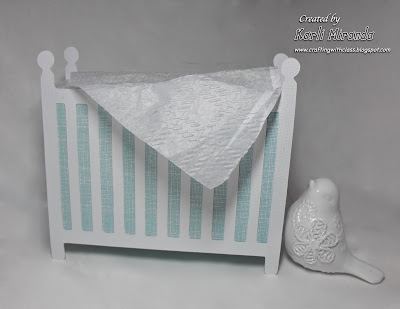
A few friends of mine are just getting started on the baby race so I thought I'd help these new mommies out with a few crib notes.
Here's what I created with the help of my Cricut:
A crib box with notes
side view:
I embossed a piece of tissue paper so it would look like a baby blanket. For the crib bedding (Box) I used a sheet of SEI Bridgeport Cardstock.
Let's peek at the inside:
I've created 8 cards and included 8 envelopes that are tucked inside.
Here are the cards:
The bottom of each card is embossed with one of the Cuttlebug Embossing Borders from the Just My Type Collection. (click on a pic to see a closer peek.) I love those cute little buttons :) These adorable little critters are from the Create a Critter Cricut Cartridge. I LUUUUUUUV this cart!!! They are just adorable! And the best part is that they are super easy to assemble because there are no little pieces. Yaaay! I think this is the best cart in the new release. These are simple cards so I could easily mass-produce (because I'll be making 24.) I think new moms can always use a cute little Thank You card. Babies get lots of gifts :)
ETA: The cards are standard A2 size (4 1/4" x 5 1/2").The critters are cut at 3"
Here's the envelope: Again you see I've used the CB Embossing border along the edge of the flap so that the card & envelope coordinate :)
I used my Gypsy to find a crib since I did not see one in the New Arrival Cart. How does that cart NOT have a crib??? There are several deets to creating the crib so I'll create a video Tut this weekend. It's not hard, it's just that there are lots of details :)
Quickie Deets:
To create the crib, you'll need: 3- 7" cribs (Everyday Paper Dolls Cart)
Base Box: 6 1/2" x 11" cardstock (score at 4 1/2" and 6 1/2" along long side)
Attach 2 sides of crib & cut 3rd crib for the sides.
Here's one last peek at it:
You can find all the products for this project at the YMH Store.
Thanks so much for peeking! I'm ready for the weekend. Are you?
Gotta Go!


Great project. Love those little critter cuties. Embossing the tissue paper- great idea!
ReplyDeleteHugs,
Kristina
Oh my! These are SOOO CUTE! I can't believe that crib!
ReplyDeleteWhat a neat idea! Would also be easy enough to create the crib in design studio or using a fence cut and few snips of the scissors. :)
ReplyDeleteOne of the best new mommy gifts ever!
ReplyDeleteAnd sooo cute, too.
Looking forward to your tutorial.
Please let us know what size cards this holds.
TFS
PJ(Jessie Adams)
I just discovered your blog today. That's way cute!
ReplyDeleteKarli, you never cease to amaze me!! This is so precious! These mommies are going to be thrilled! Blessings to you!
ReplyDeletePS There's a goodie for you on my blog!
Perfectly cute!
ReplyDeleteSo cool, that is the perfect gift for a new mom. Love the embossed envie edge, too. I'll be back to see the video tut on the crib!
ReplyDeleteWhat a wonderful idea, and I love the cards!
ReplyDeleteThis is absolutely darling!!! You make some of the most creative projects...I always leave amazed!
ReplyDeleteKarli are you tired yet of hearing how cute and adorable your cricut projects are? You better not be cause this is another fantastic one. Love seeing what you do with the cricut :)
ReplyDeleteCarli, what an absolutely amazing idea and so greatly done. My hubby and I hope to start on our baby race next year, so I'll keep this in mind :) Thank you!
ReplyDeleteP.S. sorry I messed up on my previous comment (said "week" instead of "year"... oops)
This comment has been removed by the author.
ReplyDeleteWhat a clever little idea.
ReplyDeleteOh my how sweet is this! What a lovely gift for a new Mum
ReplyDeleteI love these! So many new babies on the way here I'll have to TSL this! TFS
ReplyDelete