Showing posts with label Weekend Warriors. Show all posts

Saturday, November 14, 2009

Organization: Embossing Folders Strike back (Part 2)

Hi friends,
Today I'm sharing ways to organize your smaller embossing folders. I don't have anywhere near as many of these as I do the A2 sized folders (are you disappointed?) and I hardly ever use these little 'uns as well. But, I wanted a place where they wouldn't take up valuable space & be organized. So, today I'm sharing 3 different ideas on how to organize & store your smaller toys. Why three? 'Cause I like three---> 3 is a good number :) How about we get on with the deets:

IDEA #1: You know I luuuuv boxes so that was my first go-to idea. I bought this super cute Mary Engelbreit recipe box at Mikes (dollar section.) I love her whimsy style :) I just typed out a title for the top of the box & popped it on the lid- so easy peasy.


I cut the divider cards that came with the box in half to create dividers for my folders. I have 2 basic types of folders: 1) Medium sized folders that come with a coordinating die (3 3/4" x 3") and the small ones that come in a 4-pack (2" x 2 3/4"). I put the medium ones behind a tabbed labeled divider and the smaller ones I actually attached to the divider itself. Here's what it looks like:


Here's how I attached them onto the divider:

I added a REMOVABLE glue dot to the divider & simply placed the folder on top- voilà!


Here's the front view & the back view:


Don't like the idea of glue dots? Then you can do the same thing, except use a binder clip to hold them on to the divider:

Now just pop them into the box & when you want to use them, you can just pull out the one labeled divider & all 4 little folders will be at your finger tips. Putting them back will be a breeze too :) It's your own little folder Rolodex :)


Idea #2:

I saw this cute little bin while making my rounds at Aunt Joann's. I bought it with the "Miranda Mantra" of "buy now, think of something to do with it later." I think this would also be a great way to store these little folders:


Idea #3
Storing them in a 4x6 photo album/brag book.


I bought this one for $1. All you do is pop them into the sleeves & you're done!


As you can see, 2 of the medium folders fit perfectly in each sleeve and the 4 small ones fit in one sleeve:

You can now pop this album in the back of your A2 box & have all your folders in one place!
Speaking of A2 folders... you can also store your A2 sized folders in here as well:

They fit just perfectly! They're pretty secure because they fit so snuggly in the sleeves, but I would always keep the album upright to be sure. This is a great option if you don't have too many in your collection yet. It's also a great way to take them with you to crops & such. A much cheaper option too :) BTW, the SU!/Sizzix folders don't fit in the sleeves :(

There you have it! Are any of these ideas helpful or inspiring you to think of your own way to organize your toys? I sure hope so :) If you missed my previous post on organizing your A2 sized folders, you can check it out---> here

Thanks for peeking today! I'm off to work on report cards (which take 4-5 hours to complete- all on the computer- because I have to input 67 grades per student. Gotta love standards based report cards :( I may be MIA for a while...
Gotta Go!

Friday, July 31, 2009

Organization: Embossing folders

Hi friends,
Today I want to share how I organize my embossing folders. I luuuuuv embossing & these folders make it
quick & easy to do! I have a few ;) so let's get on with the deets:

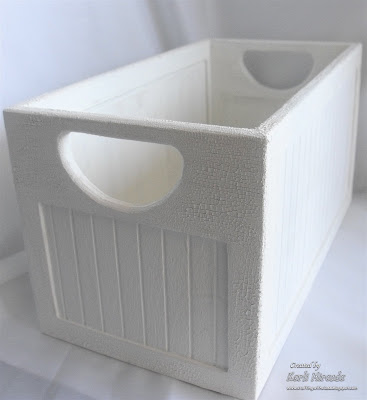
I began with a bare wooden box I got from Michaels for around $3 (with coupon.)

I painted it white & then added Tim Holtz Distress Crackle paint on some of the surfaces to give it that look of "I've had this for years." (It looks soooo cool!) I didn't want to do anything else to it-- just kept it clean & simple.
A little closer look:
I took inspiration from my SU! Swatch Book


to create a swatch book of my embossing folders.

I punched them out on white CS ('cause I've got loads of it & you can see the embossing really well on white.) & put them on an O-ring. The swatches are numbered & correspond with the number on each folder. (It is very helpful to also write the name of the folder.)
I printed the numbers on clear labels so the number was visible, but didn't block out any of the pattern. (I simply wrote it on the card before embossing.)


Another plus of having swatches is that I can see (at a glance) all the patterns I have & can easily choose the one I want. I also get to see the embossed & the debossed side as well. The numbering system makes it very simple to both find & put away folders.


As you can see, it all fits nicely into this little box.
As I get more folders I add the next number label & swatch and add it to my stash.

Now I have a little surprise for ya :) Here's a sneak peek at the new Cuttlebug Embossing folders being released. (click on the pic to see greater detail.)They are: 30.Victoria, 31.Fleur de Lis, 32.Morrocan Screen, 33.Diamond Plate, 34.Harlequin, 35.Herringbone, & 36.Stars.


These are the folders for a full A2 card. They are: (top)Flourished Frame, (left)Celtic Knot, (mid)Journaling Card, & (Rt)Owl Flourish.

Aren't they awesome!! I was so excited to see all these great designs! Seriously, it's so hard to pick a favorite one. Be on the lookout for these and they are available for pre-order at many online stores.

I hope this inspires you to think of ways to maximize organization of your toys. Thanks so much for taking a peek! We're going to the Bay Area for a few days & I've gotta get everyone packed up --- Gotta go!


Edited To Add: To answer a few questions...
YES! The new 5 x 7 embossing folders will fit in this box. They stick up a little out of the top, but since there's no lid, there's no problem :)

This box is in the wood crafts section of Michael's next to the recipe card, & file folder boxes. They're $5.99 each. (but I used a coupon :)

Saturday, June 27, 2009

Organization: CD/DVD Cases

Hi friends (and Weekend Warriors!),
I wanted to share how I organize and store my Spellbinders Dies & Stamps. I love the way some companies store their stamps in CD cases. Unfortunately, they can be a little expensive if you want to purchase just the cases through them. I found these cases at Target for $3.99 for 10. (I'm sure they also carry them in all the "marts" too) So here's what I do: (click on any pic to enlarge)

open the case & remove the disk insert

I add a strip of stencil tape to hold the dies in place (plus it's cheap & it does the job!)

Because the stencil tape is not double sided, I add glue dots to the back. This way the stencil tape is strongly held to the case. (You could also use Scor-Tape or Sticky Strip)

Next, I place the dies on the stencil tape (it holds the stencils securely)

I use the packaging insert to create a cover for the other side. I secure 2 of the sides with invisible tape.

To complete it, I just print out a label with my label maker & add it to the spine.


Ta dah! All done!
You could double up & put 2 sets in one case if you wanted to.


I do the very same thing with the DVD cases that hold my oversized dies.
I keep my CC Designs, Pink Cat Studio, & Anya (The Greeting Farm) Stamps in the DVD cases as well.

Becca Feeken had a post for the DVD cases a while back. At the time I was looking for something to store my large dies & unmounted rubber stamps- so these clear DVD cases were perfect! They're not as cheap as the CD cases, but I didn't need as many of these as I did the CD cases. I'm on the prowl for cheaper ones, but the ones I've found do not have a removable tray (the tray is built into the back piece.) But if I do I'll be sure to post!

NOTE: Be sure you get the STANDARD SIZE cases NOT the slim cases for the CDs.
For the DVDs you want the Super Jewel Box King (the 9th picture/item on the page) click here

Edited to Add: Thanks to a comment left by "J" ( free image hosting ), the CD cases can be purchased here for 200 cases for $26! So if you have friends who can use them, divi them up & share the cost! Unfortunately, the DVD cases are not available with a removable tray. But I'll keep my eyes open!

What about magnetic sheets or strips? Well, I work with my Nesties near my computer & I was advised by a "tech" person, that having magnetic material near my computer was unwise. It could cause problems for my computer so I just stick with stencil tape. (no pun intended!) It works for me. But, there are many people who use magnetic sheets & that way works for them. So choose what works for you :)

Well, I hope this helps you think about simple solutions to organizing your toys. Why weekend warriors? Because some of you will be adding this to your list of to-do projects! Next weekend, I'll be sharing what I do with the Sizzix plastic cases- so don't toss them just yet!

Thanks so much peekin' today! I'm off to watch my son play at his basketball tournament- gotta go!

Saturday, June 6, 2009

Organization: Daubers

Hi friends,
I'm under the weather right now
- feverish, allergies acting up, body aches & just feeling icky KWIM?

But today, I wanted to share the way I organize my daubers. I love using them for many reasons-they're easy to use, give great results, easy to replace, & not messy (don't get my fingers all inky!) I used to store them in a plastic baggie, but I had to search through the whole bag to find the color
dauber I wanted. Then I came across this little case. It holds 40 daubers, each in its own little compartment. The other great thing about it is that it's clear so I can see exactly where the color I want is. I labeled each dauber with the name of the ink pad I used & pop it in the case. Voila-done!


Now it's easy to keep from accidently using a dauber on the wrong ink pad. The other great thing about this little case was the price- only $5. It's slim & space saving, it locks closed & it's easy to take along in my tote bag.

Edited to Add: You can find this case here.

Thanks so much for peeking in today! I'm off to drink some hot tea- gotta go!


Saturday, May 16, 2009

Punch Book

-Sorry for the glare & blur :(

(click to enlarge)
Hi friends,
Here is my punch book. As you can see, I luuuuv punches! They are so quick & easy to work with. They are a lot easier than having to pull out my Cricut or Sizzix. This is how I organize my punches.

My punches are grouped mostly by similar shapes rather than by brand. I label the size & if it's an SU! punch. I just use my scraps to punch them out. Whenever I buy a new punch I punch one out & add it to my book. My main reasons for even creating this book were so 1) I knew what I had & not buy the same punch twice -did that before, grrr! 2) I could see at a glance what punches I could use for my project without pulling them all out. 3) I could easily take it with me to the store when looking to buy other punches. When I started this book, I wasn't really thinking about how to organize it, rather just getting them in one place. Now, I'm feeling the need to revamp & reorganize them! (I feel a summer project coming on :)

My border punches are organized by brand as you can see below with my Martha Stewart punches.

These are not all the punches I own- I just didn't want to scare you :{ But I think you get the idea, right?

As with my SU! Stamp book (you can see that here), this is made with a report cover with sheet protectors. Simple & inexpensive. I hope I have helped you to think about another way to get your tools organized. Thanks for peekin' in today! I'm off to play with some new goodies that have arrived- gotta go!


Blog Widget by LinkWithin