Showing posts with label Sharing My Favorites. Show all posts

Sunday, January 19, 2020

Trays for Ink Blending Foam Pads- VIDEO!

Heloooo crafty friends,
It has been 3 years since I posted a YouTube video, but today I am back to share something that was a problem solver for me! Like many of you, I put a velcro circle under my ink pad to attach my ink blending foam pads. The problem with this is that because I had to stack them on top of each other (for storage purposes), the ink from the pad would transfer to the lid of the ink pad that was under it.
I don't know about you, but I'm pretty "Type A" about these things so I did not like that.
In today's video, I share a solution that was inspired by the great Karen Burniston.

You can find Karen Burniston's blog post ---> HERE , where you can download her cut file and PDF. The easiest thing would be to use the cut file of course, but I didn't have access to my Cricut at the  time. The way I shared was pretty easy.
Here are the scoring measurements for 8 1/2" x 11" cardstock:
1/4", 1 1/2", 1 3/4", 2,  3 1/4", 3 1/2", 3 3/4", 5", 5 1/4", 5 1/2", 6 3/4", 7", 7 1/4", 8 1/2", 8 3/4", 9", 10 1/4", 10 1/2"
Use heavyweight cardstock. It helps the trays to be sturdy and the foam pads don't fall out. I used 110lb cardstock, but if you have 65lb or 80 lb cardstock, you might need to pinch the trays to hold the foam pads in.
Hope it helps! Until next time....Tootles!

Friday, January 15, 2010

Cricut Tip

Howdy Friends!
Today I'm sharing a Cricut cutting tip with ya. If you're a newbie Cricuteer, you have to know that you'll probably have to test your cuts. I know, what a bummer, but it's better that you know the truth from the start. If you're a seasoned Cricuteer, you already know you need to test your intended cut because 3 inches looks different cart to cart. Well, this can be a big problem as it can create a waste of cardstock. My tip is simply this: I use regular copy paper. As a matter of fact, I use my printer rejects. You know the ones where AFTER I've printed, I realized I messed up somewhere. So instead of putting it in the round file (trash can), I use it to test cuts on my Cricut. I use a very loved mat- one that won't hold down cardstock, but has a little life left in it.
Here's my current loved mat:

Make sure to press down the edges of the paper. 
Cut settings: Speed: High (for non-intricate cuts) Pressure: Med
This is what has worked for me. You may want to try out whether Medium or High speed works better with your mat. For intricate cuts, I cut at Med.

Here's the result:

I can decide if this will work or if I need to resize. I don't throw out my test cuts either. I take them to school & give them to my kiddos. They love to color them & do whatever with them at home. The test cuts are special treats in my room! (Hee! Hee!) Ultimate trash to treasure!

When the mat is truly RIP, I don't throw it out either. I take it to my classroom & use it as a splash mat & for art projects. It's a sturdy little thing & it can take a beating. We clean them with a little soap & water.

I hope these simple little tips will help you save your cardstock & money. Kermit was way off. It IS easy being green! (recycling, at least :)

I'm so excited that I'll be spending this weekend at the Scrapbook Expo & next weekend at CHA! YAAAAAAAAAY!!! I'm loving 2010 already! I'll *try* to be good ;)
Gotta Go!

Tuesday, December 29, 2009

I'm in LOVE!!!

Howdy friends,
Today I wanted to share a timesaver that ended up being a lifesaver. Well, I gave several gift cards & goodies this year & didn't have time to make a whole lot of cards for them. Then I remembered I had bought (a while back) a gift card die (Sizzix). So I dug it out & quickly & easily whipped out some gift card holders that turned out super cute!!! Here's a peek:

and the innies:


Then it hit me! I realized that they were the exact same form as the ones you get at Starbucks! See?


This die is awesome!!! Oh, I'm in L-O-V-E :)  It comes out in one long piece & with a couple of folds, you've got a gift card holder! It literally took me under 1 minute to make one ( I timed it! :) Hmmm, so I wonder which came first? The Starbucks one or the Sizzix one? Doesn't matter! This die is on my list of fav's!

Noooo, this is not the project I was talking to you about yesterday (hee! hee!) That's coming tomorrow or as soon as I'm done editing the pics. :) But since it is about gift cards I thought I would share this gift card holder. Now, today's project is for giving gift cards, but what do you do with the gift cards you receive??? Ahhh, that's what we'll find out... tomorrow :) Hee! Hee! Hee!
Gotta Go!

Friday, December 11, 2009

Poinsettia Kid Tutorial

Hi there friends,
Today I'm sharing a tutorial I've created for the Poinsettia. I know many of you are also teachers, so this is a great & beautiful way to dec your classroom or other places with your students' work. I have to say, I REALLY WISH I had a video tut for ya, because it was so hard to try to explain a couple of the steps. If anything is clear as mud, just let me know OK? :) I've asked Santa DH to get me a good camcorder for Christmas, so *hopefully* he will. I have to be very explicit or else he'll gift me size 5 1/2 shoes when I actually wear 7 1/2! (Seriously, this happened!!) So, how about we get started!

Here's what you'll need:
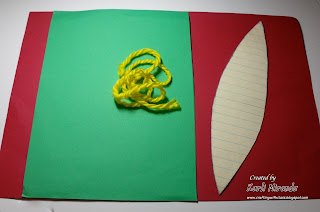
1 sheet red construction paper (12" x 18")
half sheet green construction paper
Yellow school yarn
My pattern :)


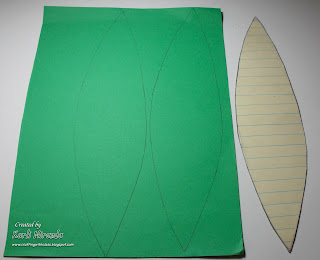
Trace the pattern 2 times on the green paper and 5 times on the red paper
(Feel free to use less or more)

Cut them out.

With your fingers, pinch the middles of each of the red petals. (This step will make it easier to assemble)


Now gather the petals one at a time and place them right next to each other. Hold them with your fingers. For kids with poor small motor skills, give them a clothespin or help them with this part.


Take the yarn & lay it across the front & down through the petals to the back


Tie a knot to secure.

Next, alternate between the 2 ends and pull it across to the other side. So you take one end, up one side (in between 2 petals), over the top, across between 2 petals (on the other side). Repeat the process until you have put the yarn between all the petals.


When complete, the front will look like this:


Here's the back:

Tie the remaining ends into a tight knot to secure.

Next, punch a hole through the center of the leaves and thread the yarn through the hole.


Tie a bow to secure or you can also tape the ends down. Trim the excess yarn.


Spread the leaves & your poinsettia is complete!


Here it is! Now it's ready to be hung :)


In my class, we make some to decorate the cafetorium for the Winter Program and some to dec the classroom. They're just beautiful IRL. My third graders do everything themselves except for winding the yarn to create the middle of the poinsettia. That part is a bit hard, but I let them try. If they have a hard time, I do that part for them.
On the last day of school (before winter break), we tape them to the top of the present they take home to their families. It looks like a big, beautiful bow.

 Like the Terminator, I'll be back---> tomorrow with a tut for a card-sized poinsettia.
Thanks for peekin' today! I hope you & your kiddos give it a try & you let me know how it turned out. You will not be disappointed :)
Gotta go!


Here's the template for you to download & use. I would recommend you print it out & trace onto index paper & make several templates. Enjoy!
Poinsettia Pattern

Monday, November 2, 2009

Organization: Copic Skin and Hair Colors

Hi friends,
Thanks so much for your well wishes :) I went to the doctor & I have the dreaded flu---> just not the kind that oinks (no tail growing here, Mary! ;) My grandma's "special cure-all drink" and chicken soup will have me back to myself in no time. (My hubby says I should drink slowly!---> What a brat!) 
Anyhoo, today I thought I would share the way I organize a certain section of my Copic markers. This set is specifically the colors I use for skin & hair. So here are the deets:


I found this container a while back during one of my rounds at Mike's. It was in the clearance section along the end of the crafting aisles. It is meant for storing the EK Success punches, but I bought it thinking I would find a different use for it. I do that A LOT, you know, buy now -think about what I'll do with it later. It's in my rat pack nature, I think :) This is what it looks like:

(It was $2.99)
It's a hard, plastic case with 8 compartments inside.

I own all the Copic Ciao markers, but I decided to get a separate set of sketch markers just for skin & hair colors for 2 main reasons. 1) These are the colors I use the most & 2) I didn't want to spend time searching to pull them out of my sets. This way, they were in one convenient place ready to use- no muss, no fuss. 

How did I chose these colors? Well, most of these are the colors Suzanne Dean uses & I luuuv her coloring. I stalk subscribe to her Coloring with Copics videos on YouTube. I also really luuuv Cassie's coloring (My Sweet Dreamers pal) but she hasn't posted any tutorials or videos---> hint, hint ;)

I typed out the numbers onto clear labels by group of skin or hair color & added them to the case.

Skin 1: E000, E00, E11, R20
Skin 2: (alternate skin tone) E50, E51, R20
Ethnic Skin: E25. E21, E13, E11 (I also like E33, especially for Latino skin)
Dark Brunette: E25, E49, E53, E59
Light Brunette: E25, E29, E31
Auburn: E13, E17, E18, E19
Dark Blonde: YR23, E35, Y23
Light Blonde: Y11, Y21, E97, E99
Black: C3, C5, C7, C9

This totally works for me! It's one less thing I need to look for, pull out, & putting them back is a snap.


To download Suzanne's list of colors (with colored samples :) and to see her videos, visit her blog here. Check out Cassie's blog in my sidebar under "Sweet Dreamers."

I have my "copycat" way to organize my Ciaos which I'll be sharing too, if you're interested. 

To answer Sophia's Question: Yes, it's perfectly fine to store your Copics vertically. I've been told it has something to do with how they're made. I also have Prisma markers (which are alcohol-based as well) & they sit upright too with no  problems. Water-based markers (like SU! Stampin' Write) must be stored horizontally (flat). 


Where to buy Copics: I have bought most of mine from ---> Carpe Diem because when they have sales... they have SALES! Reeealy good prices :) They're also a local store- pretty close to me, and the owner is nice :) He's let me shop in the store when they've been technically closed. But shop around & keep an eye out for any sales :)


Thanks so much for peekin' today! I'm off to confiscate all the Halloween candies my kids are hiding under their beds!
Gotta go!


Friday, July 31, 2009

Organization: Embossing folders

Hi friends,
Today I want to share how I organize my embossing folders. I luuuuuv embossing & these folders make it
quick & easy to do! I have a few ;) so let's get on with the deets:

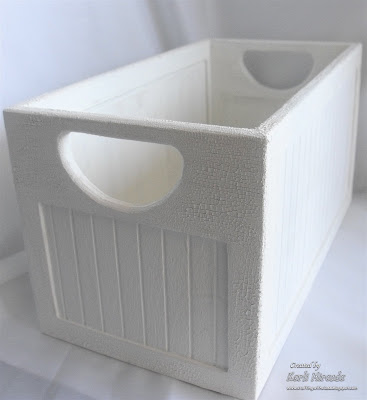
I began with a bare wooden box I got from Michaels for around $3 (with coupon.)

I painted it white & then added Tim Holtz Distress Crackle paint on some of the surfaces to give it that look of "I've had this for years." (It looks soooo cool!) I didn't want to do anything else to it-- just kept it clean & simple.
A little closer look:
I took inspiration from my SU! Swatch Book


to create a swatch book of my embossing folders.

I punched them out on white CS ('cause I've got loads of it & you can see the embossing really well on white.) & put them on an O-ring. The swatches are numbered & correspond with the number on each folder. (It is very helpful to also write the name of the folder.)
I printed the numbers on clear labels so the number was visible, but didn't block out any of the pattern. (I simply wrote it on the card before embossing.)


Another plus of having swatches is that I can see (at a glance) all the patterns I have & can easily choose the one I want. I also get to see the embossed & the debossed side as well. The numbering system makes it very simple to both find & put away folders.


As you can see, it all fits nicely into this little box.
As I get more folders I add the next number label & swatch and add it to my stash.

Now I have a little surprise for ya :) Here's a sneak peek at the new Cuttlebug Embossing folders being released. (click on the pic to see greater detail.)They are: 30.Victoria, 31.Fleur de Lis, 32.Morrocan Screen, 33.Diamond Plate, 34.Harlequin, 35.Herringbone, & 36.Stars.


These are the folders for a full A2 card. They are: (top)Flourished Frame, (left)Celtic Knot, (mid)Journaling Card, & (Rt)Owl Flourish.

Aren't they awesome!! I was so excited to see all these great designs! Seriously, it's so hard to pick a favorite one. Be on the lookout for these and they are available for pre-order at many online stores.

I hope this inspires you to think of ways to maximize organization of your toys. Thanks so much for taking a peek! We're going to the Bay Area for a few days & I've gotta get everyone packed up --- Gotta go!


Edited To Add: To answer a few questions...
YES! The new 5 x 7 embossing folders will fit in this box. They stick up a little out of the top, but since there's no lid, there's no problem :)

This box is in the wood crafts section of Michael's next to the recipe card, & file folder boxes. They're $5.99 each. (but I used a coupon :)

Sunday, July 12, 2009

Hello Kitty meets ATG

Hi friends,
I wanted to share what I did to my ATG gun! I luuuuuuv my ATG gun (you'd have to pry it from my cold, dead hand) and nothing else I've tried even comes close-- especially in cost of adhesive. Well, let's get on with the deets, right?

Before:


After: click on any pic for a closer look
I don't know why I didn't do this before! I luuuv the way it came out! And best of all, this took me like 5 minutes to do since it's all done with stickers! These are clear, vinyl stickers so they adhere beautifully and they're glittered!!! The "Hello Kitty" at the top is done in red rhinestones, but I may change that if they fall off & become too high maintenance.

Thanks for peeking & letting me share my my vamped up tool!
Oh, & "ways to use packaging" ideas & projects will continue next!--- Gotta Go!

Saturday, June 6, 2009

Organization: Daubers

Hi friends,
I'm under the weather right now
- feverish, allergies acting up, body aches & just feeling icky KWIM?

But today, I wanted to share the way I organize my daubers. I love using them for many reasons-they're easy to use, give great results, easy to replace, & not messy (don't get my fingers all inky!) I used to store them in a plastic baggie, but I had to search through the whole bag to find the color
dauber I wanted. Then I came across this little case. It holds 40 daubers, each in its own little compartment. The other great thing about it is that it's clear so I can see exactly where the color I want is. I labeled each dauber with the name of the ink pad I used & pop it in the case. Voila-done!


Now it's easy to keep from accidently using a dauber on the wrong ink pad. The other great thing about this little case was the price- only $5. It's slim & space saving, it locks closed & it's easy to take along in my tote bag.

Edited to Add: You can find this case here.

Thanks so much for peeking in today! I'm off to drink some hot tea- gotta go!


Blog Widget by LinkWithin