Hi friends,
Today I am sharing a little project I have had spinning in my brain for a while. I've been wanting a calendar for my desk at school to match the other things I've made. So I decided to get the idea out of my head & make it happen.
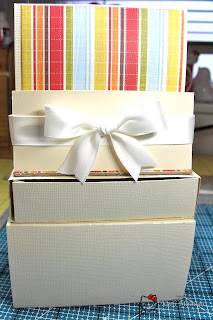
Here is what we'll be making today:
This cube features a Kleenex dispenser, 2 pull out drawers, 2 date cubes, and a top organizer.
So, ready to get started? Well, grab a venti-sized cup of joe cuz this is a lengthy tute!
Sm. Drawer:
Cut: 6 1/8" x 6 1/8"
Score: 1" on all sides
Assemble your box.
(If you need directions on how to assemble a basic box, please see
this previous tute. Use the box lid ~blue)
Sm Drawer Sleeve
Cut: 4 1/4 x 11"
Score: 1", 5 1/4", 6 1/4", 10 1/2"
Slide your drawer in:
***NOTE
Add a piece of 4" x 4" chipboard to the top of the box to give more support to the cubes.
Add some patterned paper to hide it
Lg Drawer Box:
Cut: 7 5/8" x 8 5/8"
Score: 2 1/4"on all four sides
Lg Drawer Box Sleeve
Cut: 4 3/8" x 12"
Score: 3/4", 3 1/8", 6 3/8", 8 3/4"
Slide your box in the sleeve
Tissue Wrapper:
Cut: 7 1/4" x 4 3/8"
Score: 1/2", 1 1/2", 3 7/8", 4 7/8"
Use punch, die, or craft knife to cut opening for tissue to be pulled out through. I used the SU word window punch.
Assemble your box & slide tissue pack in.
Top Organizer:
Cut: 4" x 12"
Score: 2", 5 3/4", 9 1/2", 10 1/4"
Add adhesive & fold as shown
Adhere to the top of sm. drawer box
Add strong adhesive to the back of the Tissue Wrapper & adhere that to the front side of the Lg drawer box.
Add strong adhesive to the bottom of the sm. drawer box...
Adhere it to the top of the Tissue and Lg. box
Wrap a piece of ribbon around the back part to create a pocket.
Add a bow on top
Calendar Cubes:
Download GYPSY cut file for cubes. You'll need the Tags, Bags, Boxes, & More Cricut cart. For the numbers, you'll need the Hello Kitty cart. :)
Don't have a Cricut? No worries,
DOWNLOAD THE TEMPLATE I created for you.
Use a 1 1/2" square punch to punch the layers for the numbers. Adhere them to the cube & assemble.
The numbers should be glued as follows:
Cube one: 0, 1, 2, 3, 4, 5
Cube two: 0, 1, 2, 6 (which also will serve as a 9), 7, 8
Place the cubes on top of the sm. drawer box.
DOWNLOAD the MONTHS and DAYS LABELS. Cut them apart on the solid lines...
Put a piece of magnet tape to the back of each one.
Put a magnet coin on the mat label:
Add your month label.
Here is the finished front of the box
I've also included a couple of fun countdown labels:
Here's the final product, embellished
The back pocket could be used to hold your month labels or to hold other items like a pad of Stickies.
With the open drawers:
***NOTE: the drawers are "push" drawers. The buttons are decorative, not strong enough to be used as pulls.
Well, that's it! Hope you like this project & you give it a go :) There's a version 2 of this project I'll add later. I have a kit to give away complete with everything you need to create this project, pre-cut & pre-scored. Just leave a comment :) Yup, this is open to everyone :)
Thanks so much for peeking today!
Gotta Go!


