Showing posts with label GYPSY Cut Files. Show all posts

Monday, February 25, 2013

Valentine Treats

Hi there friends,
I had forgotten to share the Valentine treats I made for my school chums. I revised my lollypop treat wrapper to better fit the Sees pops I bought. They are the same length as the original ones, but these are not as wide.

Here they are:
Here's a closer peek at one of them:
 I usually add a tiny tad of double sided adhesive to hold the pop in place, but still be able to easily remove it from the wrapper. I used some K & co papers, my heart nesties, & the conversation hearts EF to dec it out.

Here's a peek of the back:
 and from the side:
 See that Cinnamon pop?! Yum!!! It's like one big Red Hot *Ü* They're only available during the holiday season so I grab a few to enjoy!

One other thing about the new wrapper is that I was able to squeeze 5 of them on a 12 x 12 sheet. I will be uploading that from my Gypsy to my computer  & share it with ya soon.

Thanks so much for peeking!
Tootles!

Sunday, December 16, 2012

Treat Wrapper Inspired

Hello there friends,
Today I'm sharing a little concoction brewing in the depths of Studio K---> my craft room :)  I really liked the lollypop wrapper dies I've seen, but I thought they were a bit pricey---> even for me, Miss "OMG! I luv that! I have to have that! I don't care how much it costs!" Well, I thought it was too much for just one die :( so my brain started thinking... I took a couple of Tylenol... and then it hit me. Why don't I try to make my own version using my Gypsy, of course :) So in to Studio K I went & came out with my own version.
Here's what I made:
These are inspired by the lollypop wrappers. This is a cute way to dress up those yummy lollies, but I thought why stop there? 
Here's what's inside:
How about a cake pop!
Here's how easy it is to put together:
Other wrappers have two holes where you'd lace your twine or ribbon through, but I simply wrapped around the "neck" of the wrapper & tied a knot and that held it together just fine.
Now the fun part: DECORATE!
Here's another cake pop wrapper:
And a peek of the innies:
The next one does have a lollypop-

a See's Limited Edition Christmas Mint:
For this one, I kept it super simple- no pattern paper. Just used white cardstock, ran it through my Snowflake embossing folder, punched out a couple of MS snowflakes & added some Stickles for sparkle.

Oh, how about a peek of the backsides:
I added a cute little tag for the recipient :)

But don't think you can only use these for pops of some kind, nooooooo.
Take a peek at this one:

 And the innies:
A few candy cane kisses :) i added 6 in the same size baggie as the cake pops. For this one, I simply stapled the baggie & wrapper closed & added the embellishment on top.

I hope this gives you some sweet ideas to wrap up some sweet treats! You can use these for so many other treats as well :)

Soooo, am I sharing?
Oh, friends 'tis my Christmas/Hanukkah/ Kwanzaa/Diwali/ gift to you! :)
You can download the PDF template---> HERE.
You can download the GYPSY file---> HERE.  You can get 4 wrappers from a 12x12 sheet of paper.
(You'll need the George & Basic Shapes & Sweet Treats Cartridges to cut them out. I simply welded two party hats & a rectangle :)

SCORING Directions: I tried to create little notches to help you know where to score, but it can be difficult to see them especially with pattern paper, as I discovered :(  The template has the directions on the page, but if you're downloading the GYPSY file, I found that the best places to score are at 3 3/8" and 5 1/8". Be sure your paper is butting up on the left hand edge of your scoring board, if you're using that.

You can find the cello baggies I used at Mike's. They are the small 3"x4" size & come in  pack of 100.

I bought a cake pop machine so the boys & I are going to have fun making a few. Hope some make it to the wrappers! :)

Happy holiday crafting!

Tuesday, December 4, 2012

Origami Butterflies Tute

Hello friends,
Sorry I haven't had a chance to post this earlier, but I've been really busy at school. The semester is coming to an end soon, so there's a lot to do! I also have to apologize but I only had a chance to take pics at night & well... you know my horrid photog skills in the day time so...night- no bueno :( but hopefully, you'll get the point. 'Nuff blabber & let's get on with the deets:

Here's a card I posted with the origami butterfly I'm going to show you how to make today:
Now, here's the tute:
I created this on my Gypsy, but for those of you that don't have it, I have also included a pdf template. You can download the GYPSY file ---> HERE.
Download the pdf ---> HERE

I used my MS score board because it makes it easy to do, but use whatever you like for the score lines.

Begin by making sure your shape is straight.

I start by scoring the "neck" first. (see red arrow) that ensures there will be a score line there once we get going. muy importante. ;)

For visual purposes, I went over the score lines with my pencil so you can see it easier, but you would simply score at every 1/4". A.k.a every other score line on the MS board.

Score the entire shape.

Now you'll accordion fold on every score line---> back & forth...

back & forth...

don't stop now! keep going... 'til you're done :)

Now, squish it tight across the length. The tighter, the better. (yes, squish is the technical term, but squeeze and scrunch are acceptable too ;)

Next, I take & make a loop with twine. You can use thread, twine, jute, floss, hemp cord, whatev :)

Then just wrangle it to the center, still holding on to it. (ask for another hand or use a clothespin to hold on to it.)

Now, tie a tight knot.

Here's your preeetty butterfly :) All done...;)

Wait! Not just yet... here's where the magic happens :) If you notice, there's a longer end to your butterfly. This is the top. So make sure the "antennas" are up there.

Now, fan out the sides of each wing.

Spread them out. You'll start to see the butterfly emerge in front of your very eyes!!!

Adjust those wings until you're pleased with how they look. Tah dah!!! Dunzo! Easy peasy, right?!

In your template and GYPSY file, you'll find I've created 4 sizes as pictured below.
I hope you'll give it a go! They're easy & fun & are a lovely embellishment on a card, scrapbook page, or project. This is something the kiddos can do too!

Here's one more card:

Thanks for peeking today!
Gotta go!


Monday, September 12, 2011

Teacher Gifts- Calendar Cube Tutorial

Hi friends,
Today I am sharing a little project I have had spinning in my brain for a while. I've been wanting a calendar for my desk at school to match the other things I've made. So I decided to get the idea out of my head & make it happen.
Here is what we'll be making today:
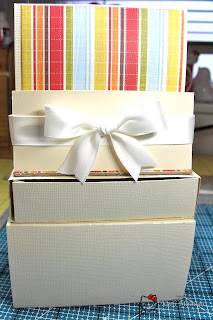
This cube features a Kleenex dispenser, 2 pull out drawers, 2 date cubes, and a top organizer.

So, ready to get started? Well, grab a venti-sized cup of joe cuz this is a lengthy tute!

Sm. Drawer:
Cut: 6 1/8" x 6 1/8"
Score: 1" on all sides
Assemble your box.
(If you need directions on how to assemble a basic box, please see this previous tute. Use the box lid ~blue)


Sm Drawer Sleeve
Cut: 4 1/4 x 11"
Score: 1", 5 1/4", 6 1/4", 10 1/2"

 Slide your drawer in:
***NOTE
Add a piece of 4" x 4" chipboard to the top of the box to give more support to the cubes.
Add some patterned paper to hide it


Lg Drawer Box:
Cut: 7 5/8" x 8 5/8"
Score: 2 1/4"on all four sides


Lg Drawer Box Sleeve
Cut: 4 3/8" x 12"
Score: 3/4", 3 1/8", 6 3/8", 8 3/4"


Slide your box in the sleeve

Tissue Wrapper:
Cut: 7 1/4" x 4 3/8"
Score: 1/2", 1 1/2", 3 7/8", 4 7/8"
Use punch, die, or craft knife to cut opening for tissue to be pulled out through. I used the SU word window punch.
Assemble your box & slide tissue pack in.

Top Organizer:
Cut: 4" x 12"
Score: 2", 5 3/4", 9 1/2", 10 1/4"
Add adhesive & fold as shown
Adhere to the top of sm. drawer box


Add strong adhesive to the back of the Tissue Wrapper & adhere that to the front side of the Lg drawer box.


Add strong adhesive to the bottom of the sm. drawer box...

Adhere it to the top of the Tissue and Lg. box

Wrap a piece of ribbon around the back part to create a pocket.

Add a bow on top

Calendar Cubes:
Download GYPSY cut file for cubes. You'll need the Tags, Bags, Boxes, & More Cricut cart. For the numbers, you'll need the Hello Kitty cart. :)
Don't have a Cricut? No worries, DOWNLOAD THE TEMPLATE I created for you.
Use a 1 1/2" square punch to punch the layers for the numbers. Adhere them to the cube & assemble.
The numbers should be glued as follows:
Cube one: 0, 1, 2, 3, 4, 5
Cube two: 0, 1, 2, 6 (which also will serve as a 9), 7, 8

Place the cubes on top of the sm. drawer box.

DOWNLOAD the MONTHS and DAYS LABELS. Cut them apart on the solid lines...

Put a piece of magnet tape to the back of each one.
Put a magnet coin on the mat label:
Add your month label.

Here is the finished front of the box

I've also included a couple of fun countdown labels:


Here's the final product, embellished

The back pocket could be used to hold your month labels or to hold other items like a pad of Stickies.
With the open drawers:

***NOTE: the drawers are "push" drawers. The buttons are decorative, not strong enough to be used as pulls.

Well, that's it! Hope you like this project & you give it a go :) There's a version 2 of this project I'll add later. I have a kit to give away complete with everything you need to create this project, pre-cut & pre-scored. Just leave a comment :) Yup, this is open to everyone :)

Thanks so much for peeking today!
Gotta Go!
Blog Widget by LinkWithin