Showing posts with label Graduation. Show all posts

Thursday, June 18, 2020

Interactive Promotion Card

Hello again friends,
Today I have an 8th grade Promotion card for a talented young lady. But it's not just any ordinary card- it's interactive!- My fave card type 😍😍😍
Here it is:
I used a few products from Simon Says Stamp including this quintuple slider die that moves five elements at the same time!

Here's what it looks like when you pull up on the tab:
A sentiment is revealed and the graduation caps fly up! So fun! I would recommend that if you have this die you follow Jennifer McGuire's tutorial because her version allows you to conceal the mechanism much better and gives you a space for that hidden sentiment. You can find Jen's video ---> HERE.

Supplies:
Hat's Off Stamp set- Simon Says stamp
Quintuple Slider die- Simon Says stamp
Congrats Dienamics- My Favorite Things
For the Gradute Stamp set- Papertrey Ink

Thanks so much for stopping by.
Until next time....

Tuesday, May 24, 2016

ConGRADulations!

Hi friends,
I'm back to share some graduation cards.
Here's the first:
I've created this type of card before because it comes together pretty quickly. The "congrats" die is from Taylored Expressions. It opens to reveal the white shirt inside which is where you'd write a message. (You can find a link to a tutorial on how to make this card at the end of this post.)


Here's card #2:
I used Blueprints 28 (My Favorite Things) to create a Peek-a-Boo Lift up flap Shaker card.

I also used By the Numbers Dienamics (MFT) and the Congrats die (Taylored Expressions).

Lift the flap to reveal the shaker:
 I added a strip of the Graduation Border (Taylored Expressions) and added some graduation confetti.

Card #3:
This uses my school colors. I used the Graduation Border again (TE) and only adhered the strip so that the graduates popped off the page a bit.

Here's another peek:
Here's the innie:
The congratulations die is from Simon Says Stamp.

Here are a few of the envelopes I decorated:
I used the Calli Letters stamp set (Mama Elephant) for the names. I really like how they look & it was quite easy to do! I added the Twine & Bows dies (Pretty Pink Posh) to add a finishing touch.

If you're interested in the tute for the first graduation card, you can find it ---> HERE.

Thanks so much for stopping by today.
Have a great week!
Tootles,

Monday, June 29, 2015

Congrats Grad

Hi ya friends,
Today I have a card I made for a friend who has completed her Master's degree in Social Work.
Here's her card:
 I used the Star Garland die in the background. It's a curved die, but the gold cardstock was pliable enough that I was able to straighten it *Ü* The numbers, mortarboard, and congrats are all MFT dies and popped up with foam tape.

Here's a different peek:
 And a peek of the innies:
 I used this week's MFT sketch #234:
 I will admit, this one had me scratching my head, but in the end, I really like the way the card came together *Ü*

I'll be playing along with the following challenges:
Sister Act Card Challenge:  #112 Anything Goes
Ladybug Crafts: Use your dies
7 Kids College Fund: #128 Anything Goes
Simon Says Stamp: Wednesday Challenge Anything Goes

Thanks so much for peeking today! Hope you have a great start to the week*Ü*
Ciao,

The 411
Stamps: For the Graduate-PTI
Ink: Versafine Onyx Black
Paper: True Black cs-PTI. Gold cs. Very Vanilla-SU.
Tools: By the Numbers Dienamics, Graduation Accents dies, Blueprints #1-MFT, Star Garland die-Reverse Confetti, Basic Set dies-Mama Elephant

Thursday, May 21, 2015

ConGRADulations!

Well Hello friends,
It's that super busy time of the year--->the end! Yes, we are wrapping up another year in the hallowed halls of Hogwarts School. I've been a busy little teacher putting my classroom away for the summer.

Today, I have a simple graduation card. It was speedy quick to make!
Here it is:
 I used the CB Congrats embossing folder in the background, added a strip of gold foil card stock along the side and added the mortarboards along it. See! Speedy quick!

Here's another peek:

I used this week's MFT sketch *Ü*
 Thanks so much for peeking. I have a teacher appreciation gift idea coming next!
Ciao!


The 411
Paper: True Black cs-PTI, Gold foil cs-DCWV
Tools: Graduation Accents Dienamics-MFT, Congrats CB EF

Tuesday, June 11, 2013

Cap & Gown Grad Card & Tute

Hi ya friends,
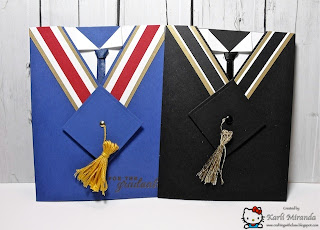
Today I have a cap & gown style graduation card to share with ya.
Here it is:
I made one similar to this one last year & thought I'd make another one & create a tute for those who have asked how I made the one from last year.

Here are the innies:

Lots of pics & details coming your way, so grab a cup of the good stuff & get crafty!
Here's what you'll need:

I started by creating a template for myself (which I will share with ya, of course :)
Start with a sheet of cardstock: 5 1/2" x 8 1/2" and score at 4 1/4"
 (or start with a sheet of 8 1/2" x 11" cardstock, cut in half to get 2 card bases.)

 Trace the template
and cut out that triangle section. Erase any pencil marks.

TRIM: cut 3 strips from 8 1/2" cardstock as shown in pic: 3/4", 1/2", 3/8"
 I used 3 colors to match the school colors but you can use as many as you want.

 Adhere all three strips together.

Cut the strip in half. (As you can see, I eyeballed "half" so it isn't perfect, but it's OK, really *Ü*
Next:
 Leave about 1/8" of "V neck" edge & adhere the trim. You want to be sure you have excess hanging from the top but doesn't go off the sides of the card base.

Flip it to the back & cut off the excess trim.

It should look something like this:
(Don't worry that the bottom edge of the trim doesn't look even. I got this!)

Moving on to the INNIES...
 Cut a white piece of cs at 4" x 5 3/8" (or cut a tiny strip off 5 1/2" ).  Find the center point (2") and make a mark with your pencil.

 I cut 1 3/4" down the mark i just made.

 Take the top corner edge & paper airplane fold it forward.

 Do the same thing to the other side. That creates the collar.

Adhere to the card base, making sure the collar is centered from the front.

This step is OPTIONAL:
 Add a couple of adhesive squares under the triangles to hold them down, but maintain dimension.

The TIE:
 I simply make a knot using  1/4" piece of satin ribbon. (you can use cardstock or wider ribbon.)

 Tighten the knot a bit...
 and trim off the excess.

Use glossy accents to adhere it to the shirt.

Here's what it should look like so far:
That trim edge still buggin' ya? don't worry, I GOT THIS!

Next, we'll work on the mortarboard:
I used a Square Nestie, but if you don't have one, simply cut a square 1 3/4". I like the way the die leaves a debossed edge. A 2" square will work too for those of you that don't want to fuss. I used the 4th largest die from the SMALL set.

 I also used it as a guide for making the tassel. I simply wrapped the gold floss around it a few times...
(By the way, NO, your eyes are not playing tricks on you- I have removed my Acrylics & my Gel nails that I've worn for YEEEEEARS... now they're shorties...tear, tear, but that's another story for another time...)
I digress...
 Gently pull off the floss & use the end of it to wrap around the top to create the tassle.

 Trim the bottom edge to the length desired- voilà!

 Pierce a hole in the center of the square

 Add a brad, but don't push it all the way down & open the prongs just yet.

 Decide on how much you want the tassel to hang & wrap the end under the brad. Now, press it flush with the square & open the prongs in the back. This will secure the tassel.

Add foam squares to the back to give it dimension.

Now we'll take care of those pesky trim ends by simply covering them up with the mortarboard *Ü*
You want to be sure the point of the board is just slightly over the tip of the "V". (see arrow)

Guess what comes next... yup! Dunzo! Like a boss :)

NOTE: Omit the tie if the card is for a female graduate. Add little pearls or blingy instead :)

Last Note: If you want to stamp something on the front, be sure you do it before adhering the mortarboard to make it easier.

Here's the finished card:


and a group pic:

Hope you liked my interpretation of this fun card style which leaves the door wide open for other types of these cards. Hope that you enjoy *Ü*

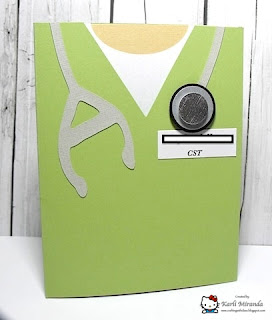
Oh, I also used the template on the scrub card:

Download the template---> HERE.

If there's anything that's clear as mud, let me know & I'll try to explain it better and/or answer your questions.

Thanks for stopping by today!
Tute-tootles!

Blog Widget by LinkWithin