Showing posts with label Projects. Show all posts

Sunday, June 28, 2020

Custom Bookmarks with Tassels! + VIDEO

Hi friends,
Today I have a non-card project to share that I created for myself!
Here they are:
I recently picked up 4 books to read over the Summer (and beyond) so I made one bookmark for each of them. They feature the cute Lawn Fawn critters reading their own books. Each bookmark also has its own tassel. I used the WeRMemory Keepers' Fuse Tool to create the plastic pockets. But if you don't have it, you can get a similar look by using a laminating sheet through a laminator or Scotch Self-Sealing Laminating Pouches.

Here's a peek of the back- some cute critter bums 🙈!

If you want to see how these came together, you can click ----> HERE, or watch below.


Supplies Used:
Bookmark Duo dienamics- My Favorite Things
Fluffy Cloud dies- Sunny Studio
Bookworm stamp set & coordinating dies- Mama Elephant
Don't Worry, Be Hoppy stamp set & coordinating dies- Lawn Fawn
Slow Down and Enjoy stamp set and coordinating dies- Lawn Fawn
Small Slimline with Lift the Flaps- Lawn Fawn
Perfectly Plaid Rainbow paper- Lawn Fawn
Really Rainbow Scallops paper- Lawn Fawn
Hello Sunshine Remix paper- Lawn Fawn
Chunky glitter- Lawn Fawn
Assorted twine
pony beads- kids craft section

Thanks so much for poppin' in today!
Until next time...

Sunday, January 19, 2020

Trays for Ink Blending Foam Pads- VIDEO!

Heloooo crafty friends,
It has been 3 years since I posted a YouTube video, but today I am back to share something that was a problem solver for me! Like many of you, I put a velcro circle under my ink pad to attach my ink blending foam pads. The problem with this is that because I had to stack them on top of each other (for storage purposes), the ink from the pad would transfer to the lid of the ink pad that was under it.
I don't know about you, but I'm pretty "Type A" about these things so I did not like that.
In today's video, I share a solution that was inspired by the great Karen Burniston.

You can find Karen Burniston's blog post ---> HERE , where you can download her cut file and PDF. The easiest thing would be to use the cut file of course, but I didn't have access to my Cricut at the  time. The way I shared was pretty easy.
Here are the scoring measurements for 8 1/2" x 11" cardstock:
1/4", 1 1/2", 1 3/4", 2,  3 1/4", 3 1/2", 3 3/4", 5", 5 1/4", 5 1/2", 6 3/4", 7", 7 1/4", 8 1/2", 8 3/4", 9", 10 1/4", 10 1/2"
Use heavyweight cardstock. It helps the trays to be sturdy and the foam pads don't fall out. I used 110lb cardstock, but if you have 65lb or 80 lb cardstock, you might need to pinch the trays to hold the foam pads in.
Hope it helps! Until next time....Tootles!

Tuesday, March 15, 2016

This is how I Rolo

Hi ya friends,
I'm popping in to share a super quick & easy idea for a St. Patty's day treat *Ü*
Here it is:
It's hard to see with the wrapper, so below it is what it looks like inside. I originally pinned something similar on Pinterest, but they had used different colored licorice to create the rainbow (still awesome :). 
 I wanted to make a little something for my boys, and when I saw these sour heads candy at the store, I knew they would much rather have them than licorice and the rainbow design was just *perfect* for the rainbow!!! I might have been a little generous with the "Gold coins", but as a mama, that's how I rol-o... I die-cut the shamrock from green cardstock & adhered the "lucky" diecut on top. It reads, "One LUCKY Mom." and I sure am. I am blessed to have really wonderful sons *Ü*

Even though they're not little boys anymore (almost 16 & 22 yrs old!), they're never too old for something yummy!

Have a golden rest of the week!
Tootles,

Sunday, April 19, 2015

¡Olé!

Hi friends,
Today I've got some goodies I made to decorate my classroom. I luuuuv anything Spanish (hmmm...wonder why ;) wink- so when I saw the Flamenco dancer stamps from La-La Land I went ga-ga!

Here's Flamenco Marci:
I used the traditional colors of Spain. I also used the LLL heart fan and die cut alphabet letters to spell "españa."

Here's Flamenco Luka:
I sponged the background with Distress Inks & ran it through the Air Mail Tim Holtz EF.

I couldn't stop there...so I decided I wanted to make a scene with both of them in it:
I created an 8x10 picture as well. I used the Papel Picado stamp from Avery Elle to hang in the background. The balloons got a super coat of glossy accents. My coloring of these guys is much better the second time around *Ü*

Here's a closer peek at the dancers:
 So cute! I *heart* these little guys! It reminds me of my brother and I when we were little...not that we were Flamenco dancers, I meant the cute part *Ü* Lol.

Here's the final picture in a frame:
I removed the glass so I could bring some of the elements forward. I added the sun & cloud dies (also from LLL) to the corner which matched the pattern paper perfectly! LUV those happy coincidences *Ü* I added another sweet fan on the lower right corner. I wanted a white frame, but they didn't have one so I opted for this gold one.

Thanks so much for peeking today!
Tootles and have a great week!

The 411 
Flamenco Marci
Stamps: Flamenco Marci- La-La Land Crafts
Ink: Rich Cocoa-Memento, Delicata Gold
Paper: Yellow, Black Red CS, Neenah CS
Tools: Heart Fan die-LLLC, Rose Garden EF- Sizzix, Copics, Script letter dies- PTI, Viva Decor Pen, Wink of Stella pen

Flamenco Luka
Stamps: Flamenco Luka- LLLC, Flamenco Marci (Spain image)
Ink: Fired Brick, Scattered Straw DI, Real Red-SU
Paper: Neenah CS, Red, Yellow, Black CS
Tools: Mini banner die- MFT, Air Mail EF-Tim Holtz, Copics, Viva Decor Pen, Wink of Stella pen

Picture
Stamps: Flamenco Luka, Flamenco Marci-LLLC, Papel Picado-Avery Elle
Ink: Real Red, So Saffron-SU, Rich Cocoa-Memento
Paper: Fine and Dandy MME, White CS, Yellow CS, Kraft CS, Red CS, Black CS
Tools: Stitched Sun & Clouds dies- LLLC, Heart Fan die- LLLC, Party Balloons dies- Lawn Fawn, Woodgrain Fence die-MFT, Tree die-Marianne Designs, Papel Picado dies- Avery Elle, Wink of Stella pens, Viva Decor pens, Copics, Glossy Accents, 8x10 Frame

Thursday, April 4, 2013

Baby Closet Dividers

Hi ya friends,
Today I have a little something (well, actually four little somethings) to share with you that are going to my teacher friend who's having her first little bundle. I originally saw this idea in the April issue of Papercrafts mag & knew I had to do it for her. The mag version was simple & sweet & since we all know I don't do simple very well, I went for something a bit more ---> me *Ü*

Here they are:
 These little clothes dividers hang on the closet bar & divide the baby clothes by size. Sweetness... happy sigh Ü. All of them were made with a combination of punches, dies, & stickers (some of which I've had for a while & finally put to good use!)

Here's a closer peek at each one:
Here's the 0-3 months divider
I used my Distress inks to create the background & then added the punched picket fence, grass & the rest are stickers.

Here's the back:
 I decorated the backs, but did manage to keep them simple. I signed each one too *Ü*

Next: 3-6 months
 I used a beautiful pearlescent & textured cardstock I've been hoarding. I sprinkled some snowflake stickers & pearls with my Viva pen.

Here's the back:

Then comes 6-12 months:
 This one was all stickers. Easy peasy!

Here's the back:

Last is the 12-18 months:
 I cut some "sand-looking" paper then just added more stickers.

Here's the back:
 All I did was emboss the cardstock with the clouds embossing folder (Darice) & outline the clouds with a white gel pen.

Here's a speedy quick look at how I made them.

I used a cereal box as the base of each divider to make them sturdier. I cut them out using my Circle Nesties (the largest circle from the LG set & the 3rd largest from the SM set.) If you can, it's a good idea to cut out your pattern paper along with the cardboard so all of them will fit perfectly when you glue them together. But what I did was use washi tape to hold the dies together & create a template of sorts & that worked out fine. I used the same washi strip for all of the cuts I made.

Adhere all your pieces & decorate as you'd like.

 The last thing is to cut a straight line at the bottom of your divider so you can slip it onto the closet bar. I sealed the edges with glossy accents.

Here they are again:
 I will be making a little box in which to put them & they will be ready to go!

It was a fun little project & I hope she finds them cute enough to use *Ü*

Thanks for peeking today!
Tootles!

Sunday, March 4, 2012

Tag- I'm it!

Hola Friends,
Every year, I look forward with anticipation for T!m Holtz' 12 Tags of Christmas! And every year I buy all the supplies & do... nothing :( as in: nada, nichts, rien, nashi, niente, ingentin, ei mitään ;)
 It's mainly cuz I'm rushing to get my Christmas cards done, so when T!m announced his
I squealed with delight! Yes! Now I might actually be able to join in the fun :) Ok, so I missed February, but I'm good this month! This month's technique is to create a Mini Tiled Mosaic, so that's what I have to share today.
Here's March's Tag:
 When I was a little girl, I loved making mosaics. I would cut up little bits of construction paper, draw a picture outline, & glue all those bits in the picture. I specifically remember making one for my grammy of her cockatiel, Paco. He is the inspiration for my tag.

Here's a closer peek at the larger bird:
Here's the smaller bird:
I started out with a tag to which I stamped the background with the SU stamp En Francais in Memento London Fog. I inked the edges with my Inkssentials blending tool. I used the 2 birdies from the Spellbinder's Bird Sanctuary dies. I didn't have the embossing powder T!m used so I just used silver then added Glossy Accents to the paper pieces to create the look of tile. (Which it really does look like IRL!!! :) The Swirly element is a Cheery Lynn die called Fanciful Flourish. I colored the leaves with YG11 for subtleness. (I didn't want the leaves to stand out). I added some fabric trim to the bottom along with a ticket with "March '12". The ticket comes from the Playful Journey stamp set from T!m's collection. I plan on using that stamp in the same way for the rest of the tags. To finish, I wrapped some sheer ribbon & a bit of pearl strand colored in E42 Copic (since it was white) to the top.
I'll be playing along in the following challenges:
Die-ing for a Challenge: Anything goes
Stamping For The Weekend: BINGO Ribbon, Lace, Diecuts
Do You Stack Up: #61 Things with Wings

Hope you like my version of T!m's tag. I had lots of fun working on it :)
I am playing catch up on February's tag. That one is in production ;)
Hasta Luego!

Thursday, December 22, 2011

For the Teacher

Hi friends,
Today is my boys' last day of school before winter break. So just in the nick of time, I finished the gift for Jordan's teacher. He was no help in getting her gift going cuz when I asked him what his teacher liked, he said, "I don't know, she goes to Taco Bell a lot."  Ugh... Taco Bell does not do anything for my appetite or inspiration :( What to do??? Then I thought of just the thing... A Stationery Box!

Here's the box closed:
 
and the box open:
 I wanted to change some of the things that went in it (according to the tute) to things I would use. (I mean who really uses stamps nowadays? ;)
 
Here's how I loaded it up:
I started by making a set of 8 personalized cards (CAS).

Here are the cards & envelopes in the box:

Next, I added a matching notebook: For lists or keeping track of all those school passwords.


Then white-out for when it's almost perfect:

Then a few "thumbs-up" paper clips:

Then a doodle/scratch pad & a 2012 Mini-Calendar:

I added a strip of Scor-Tape to the top edge of the pad & the calendar to hold the sheets together.
 Then I rubbed a little baby powder to remove the stickiness to the edge.

All that was left was a personalized pen:

One other change I made was to adhere the side flaps down to create a more finished back of the box.
Here's what I did:
If you notice, the left edge of the box has a flap (as instructed in the tute) but I like the way the edge on the right looks. A bit more finished, me thinks :)

Here's the card:
 It's made with one of my all-time fav dies- the Sizzix gift card holder die. I luuuuuv this die- it just doesn't get easier :)
 Here are the innies:
I've included 2 gift cards: Target & Starbucks.

I hope she likes her goodies :) I sure do appreciate all of her patience & hard work with my kiddo.

You can find the tute to the Stationery Box ---> Here.

You can download the calendar I used if you'd like it too ---> Here
If you're looking for more Teacher Gift Ideas, you can click on the Teacher Appreciation link on my sidebar. Hope you find something to help you show your teacher some luuuuv ;)

Now it's a mad rush to finish more cards!
Gotta Go!

Monday, September 12, 2011

Teacher Gifts- Calendar Cube Tutorial

Hi friends,
Today I am sharing a little project I have had spinning in my brain for a while. I've been wanting a calendar for my desk at school to match the other things I've made. So I decided to get the idea out of my head & make it happen.
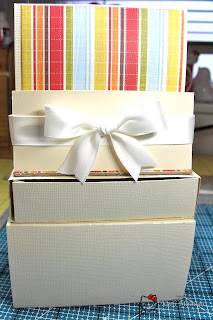
Here is what we'll be making today:
This cube features a Kleenex dispenser, 2 pull out drawers, 2 date cubes, and a top organizer.

So, ready to get started? Well, grab a venti-sized cup of joe cuz this is a lengthy tute!

Sm. Drawer:
Cut: 6 1/8" x 6 1/8"
Score: 1" on all sides
Assemble your box.
(If you need directions on how to assemble a basic box, please see this previous tute. Use the box lid ~blue)


Sm Drawer Sleeve
Cut: 4 1/4 x 11"
Score: 1", 5 1/4", 6 1/4", 10 1/2"

 Slide your drawer in:
***NOTE
Add a piece of 4" x 4" chipboard to the top of the box to give more support to the cubes.
Add some patterned paper to hide it


Lg Drawer Box:
Cut: 7 5/8" x 8 5/8"
Score: 2 1/4"on all four sides


Lg Drawer Box Sleeve
Cut: 4 3/8" x 12"
Score: 3/4", 3 1/8", 6 3/8", 8 3/4"


Slide your box in the sleeve

Tissue Wrapper:
Cut: 7 1/4" x 4 3/8"
Score: 1/2", 1 1/2", 3 7/8", 4 7/8"
Use punch, die, or craft knife to cut opening for tissue to be pulled out through. I used the SU word window punch.
Assemble your box & slide tissue pack in.

Top Organizer:
Cut: 4" x 12"
Score: 2", 5 3/4", 9 1/2", 10 1/4"
Add adhesive & fold as shown
Adhere to the top of sm. drawer box


Add strong adhesive to the back of the Tissue Wrapper & adhere that to the front side of the Lg drawer box.


Add strong adhesive to the bottom of the sm. drawer box...

Adhere it to the top of the Tissue and Lg. box

Wrap a piece of ribbon around the back part to create a pocket.

Add a bow on top

Calendar Cubes:
Download GYPSY cut file for cubes. You'll need the Tags, Bags, Boxes, & More Cricut cart. For the numbers, you'll need the Hello Kitty cart. :)
Don't have a Cricut? No worries, DOWNLOAD THE TEMPLATE I created for you.
Use a 1 1/2" square punch to punch the layers for the numbers. Adhere them to the cube & assemble.
The numbers should be glued as follows:
Cube one: 0, 1, 2, 3, 4, 5
Cube two: 0, 1, 2, 6 (which also will serve as a 9), 7, 8

Place the cubes on top of the sm. drawer box.

DOWNLOAD the MONTHS and DAYS LABELS. Cut them apart on the solid lines...

Put a piece of magnet tape to the back of each one.
Put a magnet coin on the mat label:
Add your month label.

Here is the finished front of the box

I've also included a couple of fun countdown labels:


Here's the final product, embellished

The back pocket could be used to hold your month labels or to hold other items like a pad of Stickies.
With the open drawers:

***NOTE: the drawers are "push" drawers. The buttons are decorative, not strong enough to be used as pulls.

Well, that's it! Hope you like this project & you give it a go :) There's a version 2 of this project I'll add later. I have a kit to give away complete with everything you need to create this project, pre-cut & pre-scored. Just leave a comment :) Yup, this is open to everyone :)

Thanks so much for peeking today!
Gotta Go!
Blog Widget by LinkWithin