Hola friends,
Today I wanted to share the paper bag recipe book my friends *might* make at our cookie exchange. I say *might* because they're not crafters ---> not one :( they would rather receive than make crafts. But I really wanted to do something different this year other than just exchange cookies & that's it. I tried to keep the book simple so they wouldn't be intimidated & rather take a crafty leap! Everything is pre-cut so all they have to do is embellish & slap it on the book!
So here it is:
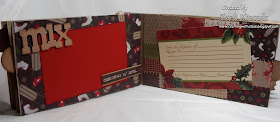
and the innies:
For this book, i used regular kraft lunch bags and papers from the DCWV Handmade Christmas stack. WOW!!! Do I luuuuv these papers!!! They're rustic but charming & definitely give you that handmade feel. There are a million & one ways to make these easy little books, but this way, you don't need adhesive- just ribbon to hold it together.
Let's start our tour at the beginning:
To get started:
You'll need as many paper bags as you would like in your book. Mine has 4. I used regular lunch bags (super inexpensive) but you can also purchase colored bags (not so inexpensive) at your local craft store. I bought mine at Target where they also have red, white, & blue ones.
Next, fold the bottom edge up towards the far edge so they meet. Do this to all of the bags & layer them on top of each other.
Then I add my paper along the edge where I will bind the book (front & back). I make a mark with my pencil where I will punch my holes. For this book, I will simply use a ribbon to bind my book together, but you can use your Bind-it-All, glue, sewing machine, whatever you'd like.
Then I use my Crop-a-dile to punch the holes through all the bags.
Now just thread your ribbon through & tie a preeeeety bow :)
Here's the back:
I punched my holes fairly close because I wanted as much of the wood paper to show. If you want more of the ribbon to show, punch your holes wider apart. I know the ribbon may seem a little over the top for this kind of book, but I am an over the top kinda girl right???
And you know what's next right????? YES! Stick a fork in it cuz it's done! See? So super easy. Now the rest is the fun stuff- DECORATING!!!
The cover:
I cut out all the words with the "From my Kitchen" Cricut cart. The cookie tray, cookies, spatula, & oven mitt are all Sizzix dies. The cookies are inked on the edges for that look of a crispy cookie edge. The middles have Stickles (for sugar) and liquid pearls for the icing. I added a mini gingerbread cookie cutter to embellish. PS: the ribbon looks waaaaaaaaaaaay awesome IRL, not like in this pic :(
Here are the innies:
next...
Then...
Those recipe cards are just place holders for the ones I will get from everyone else. The mats are ready for pics of the cookies for each recipe.
You might have noticed that along the edge of the books there are cookies sticking out. Well, those are functional as they are the pulls to get the inner panels out of the bag pocket. They remind me of nilla wafers :) mmmmm... I did have to take a nibble out of the last one ;)
So my cookie crew will not only take home yummy cookies, but also a complete recipe book I cooked up for them! I'll make crafters out of them yet ;)
If you've never made these type of albums, I hope I have inspired you to try. They're super easy peasy & way fun to make. Perfect for those scrapbookers in training :)
Thanks so much for peeking today. I really appreciate you taking the time to pop in!
Gotta go!


