Hi ya friends,
Today I wanted to share some little gifts I have for some friends this Halloween. Two years ago, I created a Snowman Candy bar wrapper:
I thought I would resurrect this project just in time for Halloween, but add a little somethin' somethin' extra---> a card front. Brilliant! Genius!! um, more like----> LAZY!!! (hee hee hee). I didn't want to make separate cards so I married the two :) This way, they get a card & chocolate pocket in one :)
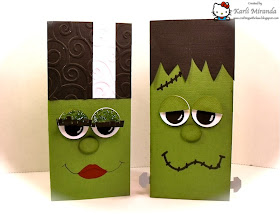
Here's my Frankie Candy Bar Card:
Here are the innies:
So the chocolate slides in the pocket where I will write my message.
These are so fun & easy peasy to create! Wanna see how?
Step into my lab...It's TUTE TIME!
Here's what you'll need (and if you don't have something, I'm sure you can easily substitute it).
Click on any pic to get a closer peek!
Tool Time:
1" circle punch, 5/8" circle punch, smallest oval from the SMALL Oval Nestabilities, arrow punch.
Recipe for monster parts:
1 green oval
1 green 1" circle (cut in half for 2 eyelids)
2 white 1" circles
2 black 5/8" circles
2 small arrows (Trim the 3 tips & the end to create the "bolts" for his neck, as shown with the arrow on the right)
If you only want to make the pocket WITHOUT the card front:
Start with a 6" x 6" piece of cardstock
SCORE at 1/2" and 3 1/4"
Add Scor-Tape or Sticky Strip to 1/2" edge. Fold edge & adhere to the other side to create wrapper. (You will have a seam on the inside of the wrapper.)
If you want to make a pocket WITH the card front, follow me:
Start with a 6" x 8 3/4" piece of cardstock.
Score: 1/2", 3 1/4", and 6".
Add scor-tape to 1/2" tab as shown.
Turn you paper so that the tape is on the right.
Fold the edge & remove the liner to expose the adhesive.
Fold on the edge & adhere to the other side to create wrapper.
Fold the last score line forward to create the card front. That's it!
Now you can stick your candy bar in the pocket to try it out. Then eat it to make sure it's fresh ;) It's OK, there's 6 in the pack :)
To create his monster features: EYES
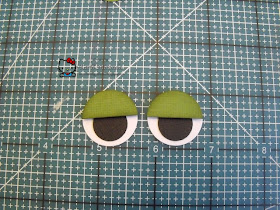
Adhere the black circles to the white ones. Add foam adhesive to the lids & nose. (I inked the front of those).
Then stick the lids on the eyeballs. Add the white highlight to his eyes with a white gel pen.
HAIR: cut a 2" x 2 3/4" piece of black cardstock. Cut random triangles from the edge.
MOUTH: Make a wavy "W" and add stitch marks and don't forget to add his SCAR!
But WAAAIIIT! Can you stand to see more???
Cuz Frankie isn't hitting the party stag. Oh no. Frankie has a hunny :)
Here they are:
Look at him... he's smitten with her. And who wouldn't be with those long come-hither lashes!
To make her, follow the same steps as Frankie but you'll need to make the following changes/additions:
HAIR: cut a 2 1/2" x 2 3/4" piece of black cardstock and a 3/4" x 2 1/2" piece of white cardstock. I ran mine through the Swirl CB embossing folder to give it her signature wavy look.
EYELASHES:
Cut a 1/2" x 1" piece of black cardstock. I used my MS fringe scissors (I knew I bought those for a reason :) to create the lash hair. I rolled it on a pencil to give it a natural curve.
Next I added a thin line of eyelash adhesive (ok, it's regular adhesive) to the top edge & adhered it UNDER the eyelid. Let it dry. Once dry you can shape it & trim any thing if you'd like.
I hand drew the mouth & added some green Stickles to give her eyes that bit o' sparkle!
Here are her innies:
And both together:
Now they're ready for a spooktacular party time! But wait... where are the guests??? Well, they're on their way... and this mad scientists will be sharing all the deets same bat time same bat channel....
Bwahahaha! Cackle! Cackle!
But in the meantime, I'll be joining in the fun in the following challenges:
Corrosive Challenge: Treacherous Treats
Crazy 4 Challenges: A Sweet Treat
Inspire Me Fridays: Anything Goes 80
Our Craft Lounge: Spooky & Sweet
Polka Doodles: Halloween
Thanks for peeking!


Too CUTE!!! Love these! Brilliant idea to combine card and treat holder into one! Love Frankie and his Mrs! Thanks for joining us at The Corrosive Challenge for "Treacherous Treats"!
ReplyDelete{hugs}
Regan
OMG Karli! These are too cute! Thanks for the tutorial, I am always looking for special little ways to treat my nieces & nephews...I think they will be getting these for Halloween this year filled w/ their favorite candy bar.
ReplyDeleteGreat candy bar cards Karli. Thank you for joining us over at Polka Doodles this week. Hugs Clare xxxx
ReplyDeletePure genius! A card and candy holder in one. Thanks for the directions. btw, I'd love to have those eyelashes :)
ReplyDeleteHow cute and fun Karli! Frank is too cute, but his honey is a riot. Love the hair and lashes! How yummy to be a card and choc. in one. You are so creative my friend!
ReplyDeleteFabulous candy holders..I love them, thanks for joining us as Polkadoodles this week.
ReplyDeleteShell xx
Yum, yum and how fun to see the sweet Mr and Mrs Frankie together. How fun it would be to get one of these all dolled up!
ReplyDelete