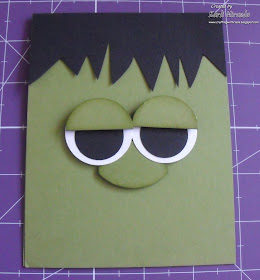
Today I have my version of Frankie to share with ya! Luuuv the Frankie :) He's so cute & loads of fun to make. So let's get on with the deets, right?

Here are the Monster Parts you'll need:
 Base: Old Olive Cardstock cut 4 1/4" x 11" Scored at 5 1/5"
Hair: 4 1/4" x 2"
Eyes: (2) white 1 3/8" circles
(2) black 1" circles
(1) old olive 1 3/8" circle---> cut in half
Nose: Old Olive Tab punch ---> cut in half
Bolts: (2) Silver Metallic Arrow punch---> Trim all 3 corners
Now that you have his parts, let's give him life!!! Bwahahahahaha!!!! (In my best mad scientist cackle)
Take your black cardstock & cut some random triangles out. There's really no right or wrong. You can also use a grass die cut in black to create the hair.

Adhere the black circles to the white circles. Add foam tape to the back of the white circles & adhere below the hair.

Ink around your old olive half circles. Add foam tape to the back & adhere on top of eyes.

Take half of the tab punch, ink it, add foam tape to the back & slide it under the eyes.

Adhere the bolts to the underside of the front of the card.
 Add a squiggle line with a black marker to create the mouth. I think of a long, flowing "W".
Now just add the stitches & the scar. And don't forget the highlight in his eyes (with a white gel pen.)
 and... say it with me---> No, not stick a fork in it! Tee! Hee! HE'S ALIVE!!!!
Thanks for peekin' at my Frankie today! If you've never made a Frankie card, I hope you'll try it! Trust me, you'll be hooked! I'm off to get the next tut ready to post--- Gotta go!

OMG I love him. Great card!
ReplyDeleteFantastic tutorial, love him. I'm going to try to make some with the kids, they'll get such a kick out of Frankie!
ReplyDeleteThis is so cute! I love the little bolts on his neck- great down to the last detail! TFS
ReplyDeleteOMGOSH!!! Thank you again for making it look sooo easy that even I can do! My grandkids & nieces will love getting this!!Great job!
ReplyDeletehugs
Brenda
I love your Frankie!
ReplyDelete