Thursday, June 30, 2016

Because You're You. I'm Me. We're We.

Hi friends,
I was playing around with the Zig Clean Color Real Brush markers and ended up creating this card:
 I used the Flutter By stamp set from Lawn Fawn. I masked & heat embossed the images in white embossing powder (Hero Arts) and used my Zigs to do some simple watercoloring on Bristol smooth paper. I used some Holographic embossing powder (ranger) on the "because" and I wish I had used my Misti so I could have double stamped it to make it super holographic :(

Here's a closer peek, but of course, it doesn't look as cool as it does in person.
   I stamped the sentiment in three colors and I used the Misti for that. But as I was masking the stamp, I forgot to remove the washi tape I was using to cover up the other parts & stamped it. AAAGH!!! I made a blob on my just-about-finished card!!! So what did I do? Added some splatters to try to camouflage it *Ü* The sentiment is from the Because You stamp set (MFT). Last I added a few Sparkling clear sequins (PPP).

I never get a chance just to "play" since I'm always busy with work and my boys and things. So for me, if I get a chance to get crafty, it is for the purpose of creating a card that I need to give to someone, not just for experimentation or exploration. So being on vacation, it's nice to be able to play, and explore, and end up making a card with it *Ü*

Thanks for popping in today!
Until next time...tootles,
 

Thursday, June 23, 2016

Shaker Pocket Card with a Twist (VIDEO!)

Hi again friends,
I'm back with my final card for day five at Camp Create by My Favorite Things. Yay! I was able to complete all five cards and earn all five badges!
Here's challenge number 5:
 So today I have a shaker card to share, but it's not your typical shaker card. It's very much inspired by a Clear Shaker Card Jennifer McGuire shared some time ago. I have created a few in the past because they are so fun to create and to give. But I always lamented that in order to get the gift card out of the shaker, they'd have to cut it open, and essentially, destroy the shaker pocket... (insert sad face here...)

So while thinking of what I wanted to create for this challenge, I thought of Jennifer's Shaker pocket. And it HIT ME! Why not ADD a pocket to the pocket! And I went to work!

Here's my shaker card:

Basically, it is the same construction as Jennifer's shaker pocket. I used one of the pockets from the baseball card sleeves I bought for making Pocket Letters (remember those things?) As it turns out, they are the PERFECT size for gift cards and little note cards, which is what I put in mine.

Here it is with a gift card instead: (It's slid into the front pocket)
In my shaker, I used the Postage Stamp Stax dienamics (MFT) to create my little note card. I used some Gold Deco sheets (Tim Holtz) and die cut the "Thank you"from the Twice the Thanks dienamics (MFT) and the flower from the Scribble Roses dienamics (MFT).

Here's what it looks like from the back:
I added star confetti as well as gold sequins and three die cut "Thanks" from the Twice the Thanks dienamics (MFT).

I luuuv Jennifer's Shaker Pocket idea and now that the recipient can get their gift card out of it without sacrificing the shaker, well, I'm just tickled pink!

This is the card you'll be seeing in the tute:
Don't ask me what happened to the original video, lol...
I invite you to watch the video tutorial below or on my You Tube channel ---> HERE.


Thanks for stopping by today! You can put this in a standard A2 envelope because the shaker card measures 4 1/4" x 5 1/2" (A2 size). I hope you'll give this card style a try because it's so much fun! *Ü*
Tootles,

Hi There, Doggie

Hi there friends,
I'm back for badge number 4 for Camp Create at My Favorite Things:
The challenge:
I decided to create a card with the partial die-cutting technique.
Here's my card:
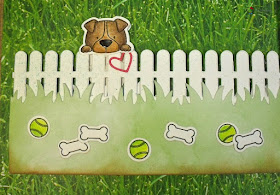
 I partially die cut the Woodgrain Fence dienamics (MFT) on the front of my card base so that the fence would also be part of the inside as well. I colored in this cuuuuute doggie image from the Lucky Dog stamp set (MFT) that has a front and back view that line up. I used my Prisma Color pencils to color him in. To keep this simple for myself, I decided to use a couple of the papers from the Watercolor Wash paper pack (MFT). I die cut the grassy border dienamics (MFT) from light green as well as the "Hi There" so that it would blend with the background.

Now for the fun part--- the innie:
I die cut a fence and grassy border to carry the outside of the card inside. I scattered lots of bones and balls this doggie might have thrown over the fence for some reason *Ü*... as you can see he's holding a heart in his paw.


Now for the inside panel on the right, I again used the pattern papers to set the scene (and not have to color the whole background! What a time saver!!!) I stamped the sentiment and added a sun die cut in the top corner. It got a generous coating of Clear Spectrum Noir glitter pen. I adhered only the center so the little rays could pop up a bit for dimension!

I had so much fun creating this card and I hope you liked it too *Ü*

Thanks so much for stopping by. I have my last card for camp coming on the heels of this one because time is not my amigo right now *Ü*

Tootles,


The 411
Stamps: Lucky Dog, I Knead You (MFT)  Thanks (Simon Says Stamp)
Dies: Lucky Dog Dienamics, Hello there dienamics, Grassy Border dienamics, Woodgrain Fence dienamics (MFT)  Stitched Sun and Clouds (LaLa Land Crafts)
Paper: Neenah Solar White cardstock, Watercolor Wash Paper Pack (MFT)
Prismacolor Pencils Used--- DOG: PC935 Black, PC947 Dark Umber, PC941 Light Umber, PC1082 Chocolate, PC924 Crimson Red  BALL: PC989 Chartreuse, PC912 Apple Green
Ink: Black Licorice Hybrid Ink (MFT), Creamy Brown, Chestnut Roan (Colorbox)

Tuesday, June 21, 2016

Watercolored Petals (Video)

Hi ya friends,
I'm back today to earn badge number 3 for Camp Create at My Favorite Things!
The task:
Here's my card:
 I used a super easy-peasy watercoloring technique to watercolor the flowers and leaves. I won't go into the deets because you can see that process in the video. I die cut the flowers using the Plentiful Petals dienamics (MFT) and the Royal Leaves dienamics (MFT) from Ranger water color paper. I used Distress Inks in Worn Lipstick, Picked Raspberry, and Wilted Violet to give them a color wash and then added depth with another more concentrated application in the centers of the petals.

Here's a closer peek at the dimension:
The sentiment (Sentimental-Avery Elle) was heat embossed in Liquid Platinum embossing powder (Ranger). Last, I added a bit of clear Wink of Stella glitter pen to the petals.

And the innie:
I stamped the inside sentiment (Simply Fab Sayings-MFT) and heat embossed it in Liquid Platinum again. I added two little leftover leaves and ink splatters to match the front of the card.

I invite you to watch the video below or on my You Tube channel ---> HERE.


Thanks so much for watching and stopping by my blog today!
I'm off to work on badge number 4!
Tootles,


The 411 
Stamps: Simply Fab Sayings (MFT), Sentimental (Avery Elle)
Distress Ink: (flowers): Worn Lipstick, Picked Raspberry, Wilted Violet  (Flower Centers): Wild Honey   (leaves): Twisted Citron, Mowed Lawn
Dies: Plentiful Petals dienamics, Royal Leaves dienamics, Stitched Rectangle STAX (MFT)
Wonky Stitches Dies (Avery Elle)
Paper: Watercolor paper (Ranger)  Neenah Solar white 110lb cs
Other: Liquid Platinum embossing powder (ranger)

Sunday, June 19, 2016

Hellooo! When Pigs Fly Slider card

Hi friends,
Today I'm going to be earning my second badge for Camp Create at My Favorite Things.
The challenge is: Creating a slider card!
 Well, this is right up my alley because I luuuv interactive cards and anything that shakes or moves or has money in it *Ü*

Here's my card:
Not only is this a slider card, but it's also a shaped card *Ü* (I'm thinking extra brownie points, right?!) I used the Cloud Stax Dienamics (My Favorite Things) to create the cloud-shaped card base. Then, I used the Hog Heaven Stamp set and coordinating dies (MFT). It is ABSOLUTELY A-DOR-A-BLE! I stamped it with Antique Linen Distress Ink on Ranger Watercolor paper to do the no-line watercoloring technique. I used Distress markers in Spun Sugar and Antique Linen. I used a little Worn Lipstick Distress marker on the bow.
     I die cut the Hello There dies (MFT) from Silver glitter Deco Sheets (Tim Holtz) and cut a couple extra "o's". The sentiment comes from the Delicate Pretty Poppies stamp set (MFT). Finally, I scattered some silver star confetti and used my ice white Viva Decor pen to add the dots around the cloud. The little wings got a generous coating of Clear Spectrum Noir Sparkle pen.

Here are a couple more pics of the sweet little pig gliding through the cloud

 and here's the innie:
 The sentiment is also from Hog Heaven. The finished card measures 3 3/4" x 5 1/2" so it fits perfectly in a standard A2 envelope.

You will notice that the next few cards will all be "Thank You" cards because I have lots of sweet friends who were wonderfully kind for my birthday *Ü*

Thank YOU sow much for stopping by today!
I'm off to work on badge number 3!
Tootles,
Karli

Friday, June 17, 2016

Glitzy Glitter Polishes (Video!)

Hi friends,
Yes, I'm back so soon! and with another VIDEO! I know, stop the madness- lol, but it's true!

My Favorite Things is hosting Camp Create and today I'm earning my first badge:
Here's the card I created:
 I used Martha Stewart fine glitter on the die cut nail polish bottles (Taylored Expressions). First, I placed some Stick-It adhesive to the white cardstock and die cut the bottles so there would be adhesive on them. I die cut the tops in black cardstock.

Here's the innie:

The video will walk you through the steps of how this card was created so I invite you to watch it below or on my YouTube channel----> HERE.

Note: I forgot to mention in the video, that I sprayed all the glittered bottles with hair spray to set the glitter.

Thanks so much for stopping by today & I hope you enjoy the video.
Until next time... I'm off to earn my second badge!
Tootles,


THE 411
Stamps: Gumball Greetings, Kind Thanks (MFT)
Dies: Nail Polish (Taylored Expressions), Thanks (Simon Says Stamp), Blueprints 29 (MFT), Basic Set (Mama Elephant)
Paper: Neenah Solar White cs, True black cs (PTI)
Other: Martha Stewart Glitter Set of 24: Garnet, Fire Opal, Yellow Barite, Peridot, Lapis Lazuli, Charoite   Prisma Glitter (Hero Arts),  Black Soot Distress Paint
Distress Inks: Candied Apple, Carved Pumpkin, Squeezed Lemonade, Mowed Lawn, Blueprint Sketch, Wilted Violet

Thursday, June 16, 2016

For Dad (Video)

Hello there friends,
I'm back with one more Father's Day card with a video!
Here's the card:
I used the Dad + Me stamp set and coordinating dies (Lawn Fawn) for most of the images. I used Brusho colors to create the background (which is so colorful and pretty in real life!) I was inspired by these beautiful cards by my crafty pal, Lisa, where she used Brushos. I picked up a few colors to see if I liked them and WOW!!! They're amazing! It's like the magic of heat embossing lol *Ü* I found that using Brushos was a very organic and effortless way to create the background and despite my Type A,  NO loosey goosey style, these were super fun to work with *Ü* Yes, you will be seeing these again!

Here's a peek of the innie:
I did use the mirror image stamping technique to get the little moose facing Dad moose. I tried it a few ways but ultimately, I thought using the mirror image stamp I showed in the video (as well as in my previous video) gave the best results.

Well, the video will walk you through the card-making process so I invite you to watch it below
or on my YouTube channel ----> HERE.

Thank you so much for stopping by today.
Until next time...
Tootles,
Karli


The 411 
Stamps: Dad+Me, Mom+Me, Woodgrain Backdrops (Lawn Fawn), Mirror image stamo (Rubber Stampede)
Ink: Black Licorice Hybrid, Chocolate Brown Hybrid (My Favorite Things), Wild Wasabi, Pistachio Pudding, Crumb Cake (SU)
Paper: Neenah Desert Storm cardstock, Mohawk Bright White 110lb cs, Strathmore 500 series watercolor paper
Copics Used: E55, E57, E59
Brusho Colors: Leaf Green, Turquoise

Friday, June 3, 2016

For PaPa (Video)

Hi friends,
 I have a Father's Day card for my sons' grandpa to share today along with a video of how it came together.
Here's the card:
 and the innie:
  I used a Mirror Image stamp (from Rubber Stampede) I've had forever and a day so, I don't know if it is available. However, Paper Smooches and So Suzy Stamps offer versions of the mirror image stamp. I used the mirror image stamp so both cubs are facing PaPa bear. It's a tricky process using that mirror image stamp! But here are a couple of tips I have for you:
1) Using Versafine Onyx Black ink gave the cleanest, darkest impression.
2) Press DOWN FIRMLY on the image to transfer without rubbing or shifting the paper.
3) Use a Copic multiliner (if using Copics) to trace the image so it looks like the original image.

I will apologize in advance about the coloring part of the video... as some of it was out of frame... ok, a lot was out of frame :( lol. but you're not missing much...it was super simple coloring.

Here's the video:
Or watch it on my YouTube Chanel ---> HERE.

I thought this would be a great stamp set for PaPa's card since he and the boys go on fishing trips with him *Ü*

If you have any questions, please leave them in the comments section and I will do my best to reply.

Thank so much for stopping by and watching. *Ü*
Tootles,
 
The 411:
Stamps: Lawn Fawn: Dad+Me, Woodgrain Backdrops, Mirror Image stamp from Rubber Stampede
Distress Inks: Mowed Lawn, Tumbled Glass, Faded Jeans
Spectrum Noir Clear Overlay pen, Neenah Desert Storm cs, Neenah Solar White cs
Copic Colors: Fish: E08, Y08  Hat: YG63, B45   Bears: E55, E57, E59