Thursday, July 28, 2016

Sympathy Cards

Hello friends,
Sadly, I have two sympathy cards to share today.
Here's the first:
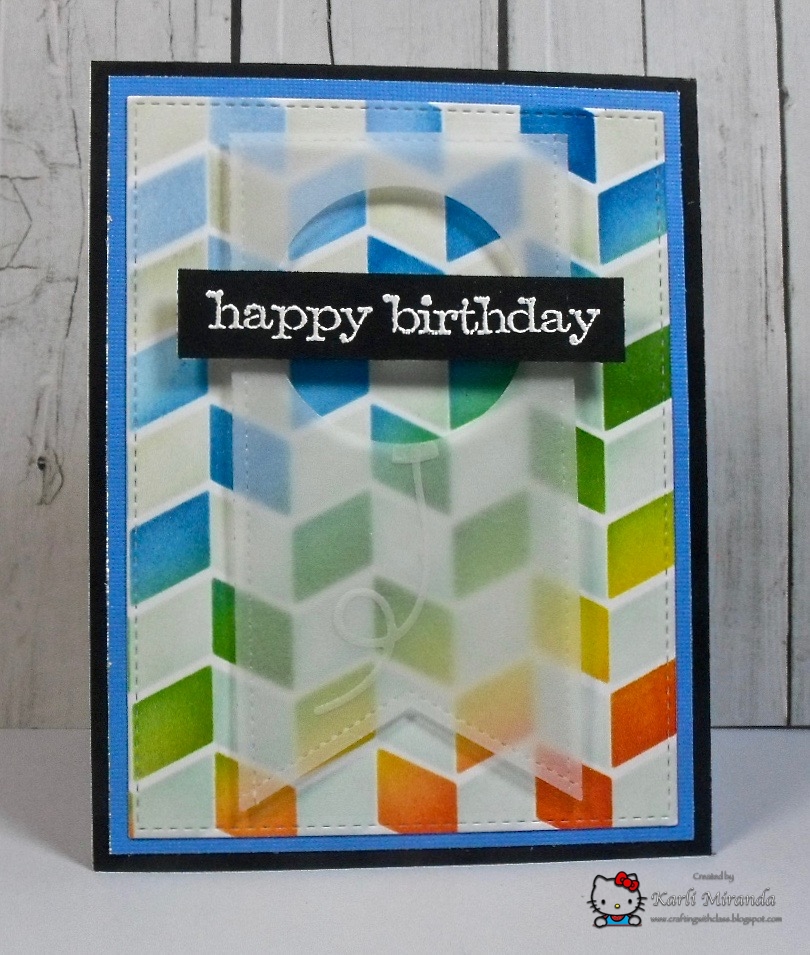
I used the Peony Bouquet stamp set (Altenew) and water colored with Distress Inks (shaded lilac & wilted violet) I used a bit of mowed lawn on the leaves and pumice stone in in the background. The "with sympathy" die ( Lil Inkers) was cut with silver cardstock.

Here's a peek of the innie:
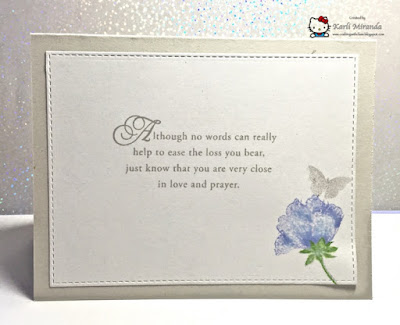
The sentiment comes from the "With Sympathy"stamp set from Papertrey Ink. It has really lovely sentiments and anytime I make these type of cards, I reach for this set.

Here's the second card:
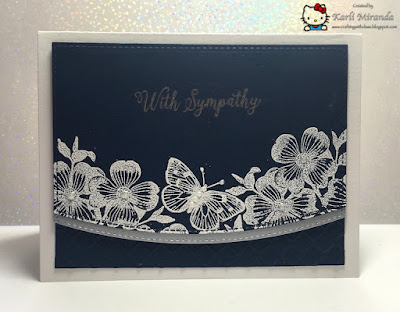
I heat embossed the Antique Flowers & Butterflies stamp set (Hero Arts) with white embossing powder (Hero Arts). I then took the curved edge die from the Basic Stitched Edge dies (My Favorite Things) to die cut the bottom edge. I used the same edge die to die cut a silver piece of cardstock to layer below it. Then, with the remaining blue piece, I ran it through the chain embossing folder (lifestyle crafts) and adhered it underneath.

I don't think anyone likes to make sympathy cards, and I hope it's a long time until I have to make another...

Thanks for stopping by friends!
Until next time...

Thursday, July 21, 2016

With Heartfelt Sympathy

Hi friends,
I have a sympathy card I made for someone who recently lost her Dad.
Here it is:
 I used the Roses All Over background stamp (MFT) and stamped it in Manatee ink (Lawn Fawn) on the gray cardstock base. I die cut the main panel with the Cross Stitch Rectangle Stax dienamics (MFT) and adhered the "With Sympathy" die cut (Lil' Inker). Then I layered the banner strips. Last, I adhered a Calla Lily from my stash. Kept it simple.

I used this week's MFT Sketch #290
 and MFT Color Challenge #49

Thanks so much for stopping by today.
Until next time...

Monday, July 18, 2016

Friends Don't Let Friends Drink Alone

Hi again friends,
If you've been to my blog, you know I'm a HUGE fan of My Favorite Things. Today I have created a special card for MFT's 10th Birthday Celebration Bonus Challenge.

I have enjoyed using MFT stamps and dienamics for many years, so I thought it would be appropriate to grab a couple of sets from the bat files to create for this challenge. Since this is MFT's 10th birthday, we are to include 10 of something. See if you can spot my 10 *Ü*

Here's my card:
This was a line called "Who's That Girl" and I really liked them because the girl could be anyone, any skin color.  This stamp set is called Catch Some Rays. Now, I must say this girl does NOT represent me. I don't wear a bikini! (Wink ;) but I have been know to enjoy one or two coconut lime mojitos from time to time. As in every time I go to eat at Lazy Dog *Ü* I colored her with Copics. I stamped the drinks 10 times (DING! DING! DING!) beside her lounge chair and in her hand. I colored them with the Spectrum Noir Sparkle Pens and then added Icicle Stickles because it has chunky glitter and that made it look more like ice cubes.
I die cut the "friends" die (Friendships are Forever- My Creative Time) from different colored cardstock from my scrap bin to create the background and so that ultimately the card would read, "Friends Don't Let Friends Drink Alone." I placed them all on my cardstock piece and when I was happy with where they were placed, I used a piece of Press 'n Seal and picked them all up at once, added adhesive to the backs in one swoop, and placed them all back down on the front of the cardstock. This trick is such a time saver- let me tell ya! To finish, I added a Stitched Rectangle Frame die-cut- MFT (left over from another project) and adhered the image panel with foam tape. I also added a few Sparkling Clear sequins (PPP). 

I still have all of the Who's That Girl stamp sets I purchased. ( I counted 14 sets!)  I just can't let them go. They're unique and fun to play with!

Again, Happy 10th Birthday to MFT!
Thanks so much for stopping by today *Ü*
Tootles,

Sunday, July 17, 2016

Birthday Candles

Hello friends,
I have a birthday card to share today.
I love making birthday cards! It's a totally happy experience for a happy reason. I pulled out some old supplies and mixed them with some new ones. I used the Candles #2 die (sizzix) to die cut the candles from white cardstock and from the Tranquil Textures Pattern Paper (MFT). I colored the flames with the Spectrum Noir Sparkle Glitter pens in Pink Champagne and Moonlight. These colors look really pastel soft on the packaging but they are not. The colors are quite bright and vibrant!

I die cut the "happy birthday" from white craft foam and then added Diamond Stickles to the top. I sprinkled on some Crystal sequins (Darice) as well as some holographic stars. For the background, I used the Big Balloons stencil (MFT) with Tumbled Glass, Mowed Lawn, and Shaded Lilac Distress Inks. I added some SN Clear Sparkle overlay pen to the top of the balloons. I mounted the whole panel to a Grout Gray cardstock base.

I used this week's MFT Sketch #289 for my card:

 Thanks so much for stopping by! I know I've been posting quite a bit lately, but I'll be back to school in a couple of weeks, so I'll be back to my less frequent posting... so I hope you don't mind a few extra cards from me in the meantime *Ü*

Have a great day!

Saturday, July 16, 2016

Background Bonanza: Mary Engelbreit Inspired

Hi friends,
I'm back to earn my 5th and final badge for MFT's Camp Create.
The final badge is for creating a background.
 Here's my card:
I still had the Hog Heaven stamp set on my desk from the masking challenge and as I was thinking about this challenge the little flowers caught my eye. There are three sets of flowers in this stamp set that I could use to create my background- and you know how I like threes. 3 is a good number! *Ü* The flowers reminded me of the flowers on many Mary Engelbreit designs. (My fellow teachers out there know what I mean ;) So that is what inspired my background design.

Yes, this took a loooong time! Maybe there was a quicker way, but I couldn't think of it! I stamped the flowers a bunch of times with Black Licorice Hybrid ink (MFT) and colored them with Copics using the bright bold colors Mary Engelbreit uses. After they were all colored, I die-cut them all using the coordinating dies. Since I didn't want a white border around my images (and I didn't want to fussy cut them) I decided the easier thing would be to color the white space in with my Memento Tuxedo black marker.
 Once all of that was done, I laid out all the pieces on the black cardstock panel and lay a piece of Press 'n Seal on top and picked them up all at one time. I added multi medium matte adhesive to the backs and placed them all down at the same time! That was a HUGE timesaver instead of gluing them one at a time *Ü* The "hello" die cut is from the Sentimental dies set (Avery Elle).
To finish, I added white dots to complete the ME look and made stitch lines around the panel with a white gel pen.

In the end, I thought it came out very whimsical and Mary Engelbreit-ish *Ü*

For my non-teacher friends this is a Mary Engelbreit bulletin board trim I have in my classroom collection of borders *Ü*:
Thanks so much for stopping by today!
May your day bloom bright with happiness!
Until next time...

Friday, July 15, 2016

Die-Cut Inlay and Masking

Hello there friends,
I'm back with two more cards for two more days of Camp Create at My Favorite Things. Today, I am collecting badges 3 & 4.
First up is die-cut inlay:
Here's my card:
 I heat embossed the Roses All Over background stamp (MFT) with Liquid Platinum embossing powder (Ranger). I did simple watercoloring with Distress Inks in Squeezed Lemonade, Wild Honey, Picked Raspberry, and Wilted Violet. I used the Stitched Basic Edges die (MFT) to create the edge. I die cut the "Thanks" die from the Thanks and Hello dies (MFT) from a piece of cardstock I had embossed with liquid platinum and then die cut the "thanks" from the watercolor panel so I could inlay the die cut.

Here's another peek:

I decided to create another card with the scraps:
I was going to throw out the rose panel because I goofed. But I decided to keep it and use it with the scraps. I added a strip of washi tape across the top that matched the colors quite well.

Here's my card for Badge #4 Masking:

I have said it before, but these little piggies from the Hog Heaven stamp set (MFT) are sooooow ADORABLE!!! I used the instaframe dienamics (MFT) and ran it through the Tiny Stars embossing folder (Paper Studio). I masked the piggies and then added the "unicorn" to photobomb the picture. Now, I used "unicorn" in quotation marks because that's actually the horse from The Whole Herd stamp set (MFT). I drew in the little horn *Ü* I mean if you're going to be photobombed, it might as well be by a unicorn, right?!?! They were colored with Copics and stamped in Grey Flannel Memento ink. I added lots and lots of Stickles to his mane.

In case you were wondering...
Copics used: Unicorn/Horse- C00, C1, C3  Piggies: R0000, R00, R01, R30  Background and Banner: BG10

Well, thanks so much for popping in today.
I have one more card coming to earn my last badge.
Tootles for now,

Wednesday, July 13, 2016

Fantastic Foiling & Coloring on Kraft

Hi ya friends,
I have a couple of cards to share for Session Two of MFT Camp Create. I had a great time participating in the first camp session, I thought I'd enroll again!

Today I'm sharing a card each for Day 1 and Day 2.
First badge up for grabs is for Fantastic Foiling
 Here's my card:
 Sorry about the picture :( but if photographing white is hard enough, imagine trying to capture holographic foil! lol! I don't think I've ever done foil before so I was very excited to try the technique with this Holographic foil from Heidi Swapp. I followed Jennifer McGuire's technique for using foil with stamps using my laminating machine. It turned out OK, but maybe next time I will let the machine warm up for a longer time. (I think i might have been a bit impatient *Ü*)

I used the Delicate Pretty Poppies stamp set (My Favorite Things) and the grateful sentiment from the Grateful For You stamp set (MFT). The flowers foiled much better than the sentiment, I think because this technique may work best with more delicate or detailed stamps. The holo on this card is so pretty in person! I think it would make a beautiful wedding or anniversary card.

My second card and second badge for Coloring on Kraft:

Here's another technique I'm not sure I've done before, but I thoroughly enjoyed the process! I am a total sucker for anything apple! As a teacher, I think it's required by law to love apple stuff! *Ü* I used a stamp I've had for ages from Peddlers Pack called Apples. It's a huge image ( 3 3/4" x 5") so it pretty much takes up a whole A2 card front. I stamped it on Kraft cardstock with Kraft ink and colored it in with my PrismaColor Pencils. I die cut the image with a stitched rectangle die from Blueprints 29 (MFT) and lined the edges with my gold Krylon marker. I adhered it to a Real Red cardstock card base. I added a little banner also from Blueprints 29 and stamped the "Thanks" from the Perk Up stamp set (MFT) heat embossed in gold.

In case you'd like to know...
Prisma Colors Used:
Apples: Crimson Red, Crimson Lake- Spring Green, Apple Green-  Yellow Ochre, Jasmine
Leaves: Kelp Green
Apple surface: Cream, Sand
Stems & Seeds: Chocolate, Dark Umber

Thanks so much for popping in today!
I'll be back with more camp creations *Ü*
Tootles,

Friday, July 8, 2016

Happy Bear-thday!

Hello there friends,
I have a bear-thday card today *Ü*
Here it is:
I used the Beary Special Birthday stamp set and coordinating dies (My Favorite Things) as my focal image. This cute little bear (with a tummy full of cake!) was watercolored with Zig Clean Color Real Brush markers. I added some Spectrum Noir Clear overlay sparkle pen on the icing and gave it a good coat of Glossy Accents. I used the InstaFrame Dienamics (MFT) to ground the little bear.

Here's a peek of the innie:
This sentiment comes from the Big Birthday Sentiments stamp set (MFT). I know it's hard to tell, but I heat embossed the candles in white and the flames were colored with a zig marker.

I used this week's MFT Sketch #288 on my card:
Thanks so beary much for stopping by today!
Have a great weekend!
Tootles,

Sunday, July 3, 2016

Masculine Birthday Card

Hi friends,
Ahhh...Masculine cards... the Jar Jar Binks of cardmaking. Well, at least that's how I feel about them because I really struggle with them *Ü* It isn't because I don't enjoy creating something for the guys in my life, but you have to keep these cards pretty clean and simple- and that's my Kryptonite.

Here's my card:
I used the Chunky Herringbone Stencil (MFT) to create the background. I ink blended with Bashful Blue, Pacific Point, Wild Wasabi, Crushed Curry, and Tangerine Tango inks (Stampin' Up).  I turned the stencil and used the ink left on the stencil to create the shadows. I die-cut a circle from the vellum Fishtail Banner (MFT) and popped it up using the sentiment strip to hide the foam adhesive. I decided to turn the circle into a balloon so I added the balloon tail and string from vellum as well (Party Balloons -Lawn Fawn).

Here's the innie:
I ink blended the bottom with the same ink colors and stamped the sentiment which comes from the Happy Everyday stamp set (Simon Says Stamp).

I used this week's MFT sketch #287:
Even though this card is not dark colors typically associated with more masculine cards, I think he'll like how colorful it is.

Thanks so much for stopping by today!
Until next time...
Tootles,

Friday, July 1, 2016

Little Mermaid Inspired

Hi friends,
Recently, I attended the stage production of The Little Mermaid and it was absolutely magical! I was like a little girl totally entranced with the production, sets, dance numbers and of course--- the music! So when I pulled out the Mermaid For You stamp set from Lawn Fawn, I knew I had to create my own underwater seascape featuring Ariel.
Here's my card:
I used the Mermaid for You and Fintastic Friends stamp sets and coordinating dies (Lawn Fawn).  I colored all of the images with the no-line watercoloring technique using the Zig Clean Color Real Brush markers.
 I used my Spectrum Noir Clear Overlay pen on the coral and on the mermaid's tail.
The background was created with the Brusho powders in Leaf Green and Turquoise.

I added a bit of Stickles for even more sparkle, sprinkled some sequins, and added a few Dew Drops for bubbles.

Here's a peek of the innie:
I really love how this card sparkles and shines in person *Ü*
 Tanks for stopping by today.
Have a great weekend and Happy 4th of July to those here in the states! Be safe!
Blog Widget by LinkWithin